Advanced Settings Guide
Master every control in Advanced Mode for professional, consistent results. Perfect for studio-quality content and repeatable workflows.
Basic vs Advanced Mode
Basic Mode
Use when you just need a good result quickly. Lets the model choose sensible defaults.
Available Controls:
- • Prompt & Negative prompt
- • Aspect Ratio selection
- • Model type (Model vs Engine)
- • Batch size
Best For: Quick iterations, social posts, testing ideas
Advanced Mode
Use when you want studio control or repeatable looks. Adds comprehensive controls for professional results.
Everything in Basic Mode +
- • Resolution control
- • Style Guidance (positive & negative)
- • Style Enhancement & Strength
- • Guidance Scale (Creative ↔ Accurate)
- • Quality Settings (Ultra Quality)
- • Face Strength for characters
- • Anime/Cartoon toggle
Best For: Professional content, consistent branding, final outputs
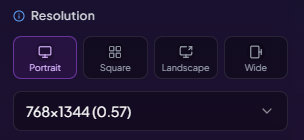
Resolution Control
Choose Exact Pixels
In Advanced Mode, you can select specific resolutions instead of just aspect ratios. Higher resolutions provide more detail but take longer to generate and cost more credits.
Portrait Options
Square Options
Landscape Options
Resolution Impact:
Higher resolution = more detail and sharpness, but longer generation times and higher credit costs. Choose based on your final use case.
Style Guidance
Positive Style Guidance
Global keywords automatically applied to enhance every generation. Perfect for maintaining consistent style across multiple images.
Photography Examples:
"photorealistic, 85mm lens, f/2.0, studio lighting, professional photography"
Portrait Examples:
"high quality, detailed skin texture, natural lighting, sharp focus"
Artistic Examples:
"masterpiece, highly detailed, cinematic lighting, vibrant colors"
Negative Style Guidance
Global avoid list to prevent unwanted elements in your generations. Essential for maintaining quality and avoiding common AI artifacts.
Quality Issues to Avoid:
"blurry, out of focus, low quality, pixelated, artifacts, noise"
Style Issues to Avoid:
"anime, cartoon, illustration, CGI, plastic skin, fake, unrealistic"
Technical Issues to Avoid:
"watermark, text, logo, signature, low-res, compressed, jpeg artifacts"
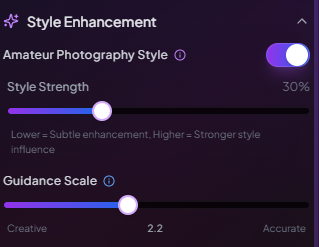
Style Enhancement
Amateur Photography Style
This toggle adds a natural, candid feel to your images, making them appear more authentic and less "studio-perfect." Great for social media content.
When ON:
- • More natural, ambient lighting
- • Less "studio-perfect" composition
- • Candid, authentic feel
- • Good for lifestyle content
When OFF:
- • Professional studio quality
- • Perfect lighting and composition
- • Polished, commercial look
- • Good for business content
Style Strength Slider (10% - 60%)
10-30% (Subtle)
Slight natural enhancement, mostly professional look
30-50% (Balanced)
Good mix of professional and natural elements
50-60% (Strong)
Very candid, authentic amateur photography feel
Guidance Scale (Creative ↔ Accurate)
How Strictly to Follow Your Prompt
Controls how literally the AI interprets your text and style guidance. Lower values allow more creative interpretation, higher values stick closer to your exact words.
1.5 - 2.0 (Creative)
More creative, looser interpretation of your prompt
- • Artistic freedom
- • Unique compositions
- • May deviate from prompt
- • Good for exploration
2.0 - 2.6 (Balanced)
Perfect balance for most portraits and content
- • Best for portraits
- • Reliable results
- • Good prompt adherence
- • Recommended default
2.6 - 3.0 (Accurate)
Very literal interpretation of your prompt
- • Strict adherence
- • Predictable results
- • Less creativity
- • Good for specific needs
Quality Settings
Ultra Quality Toggle
Enables additional processing steps for maximum detail and refinement. Significantly improves skin texture, hair detail, and overall sharpness.
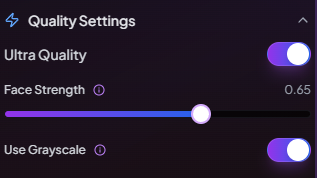
Benefits:
- • Sharper skin texture and pores
- • More detailed hair strands
- • Better fabric textures
- • Enhanced overall clarity
Trade-offs:
- • Higher credit cost (typically 3-5 credits)
- • Longer generation time
- • May occasionally over-sharpen
Face Strength Slider
When using characters, controls how strongly the generated image matches your selected character face. Essential for consistency across multiple images.
0.50 - 0.75 (Natural Variation)
Good likeness with natural variety. Each image looks like the same person but with natural expression differences.
0.80 - 0.95 (Maximum Consistency)
Very strong character match. Best for brand consistency where every image needs to look like the exact same person.
Additional Controls
Allow Anime/Cartoon Styles
Toggle that controls whether the AI can produce anime, cartoon, or illustrated styles instead of photorealistic results.

ON: Allows anime/cartoon/artistic styles
OFF: Forces photorealistic results only
Keep OFF for realistic portraits and influencer content. Turn ON only if you want stylized or artistic results.
Use Grayscale
Simple toggle that converts your generated image to black and white. Perfect for artistic or vintage-style content.
ON: Monochrome black and white output
OFF: Full color results (default)
Pro Tip: Grayscale often enhances dramatic lighting and can make portraits look more professional and timeless.
Recommended Settings by Use Case
Professional Headshots
Cost: 4-5 credits per image
Social Media Content
Cost: 2-4 credits per image
Creative/Artistic
Cost: 2-5 credits per image
Credit Cost Breakdown
How Credits Are Calculated
Base Cost Factors:
Batch Multiplier:
Typical Ranges:
Advanced Mode Best Practices
Do This:
Start Simple
Begin with default Advanced settings, then adjust one setting at a time
Save Your Presets
Keep notes on settings combinations that work well for your style
Test Before Batches
Generate single images to test settings before creating large batches
Avoid This:
Extreme Settings
Very high or low guidance scale can produce unpredictable results
Conflicting Guidance
Don't put the same words in both positive and negative style guidance
Over-Optimization
Don't use Ultra Quality for every image - save credits for when it matters
Master Advanced Mode
Now that you understand all the controls, start experimenting with Advanced Mode. Begin with the recommended settings for your use case, then fine-tune from there.