Get started
How to light a shot in Stage, step by step
- 1
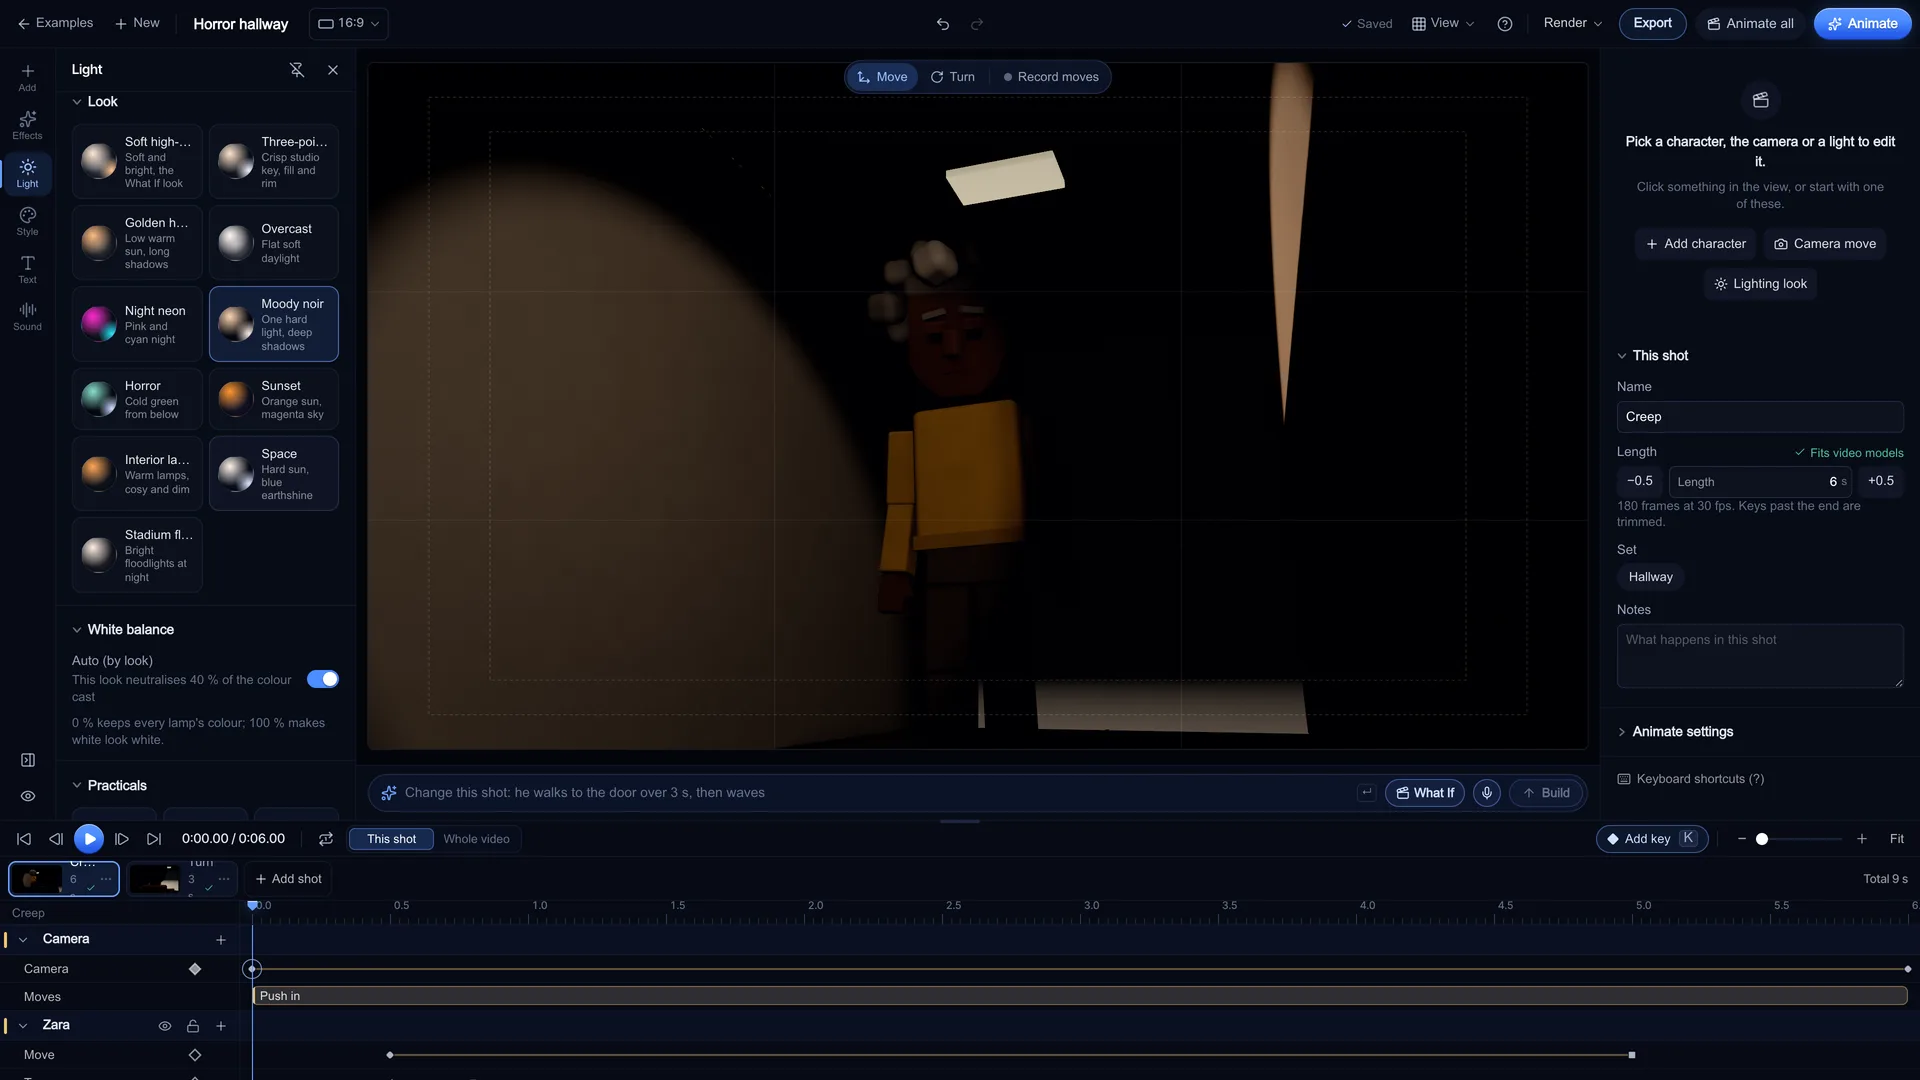
Pick a look on the Lighting tab
Open a scene, go to the Lighting tab and click a tile under Look. Each look writes a full rig (key, fill, rim, practicals, ambient, sky and haze) in one click, and the lit sphere on the tile previews it. Start with Soft high-key for clean comedy, Moody noir for one hard light and deep shadows, or Golden hour for low warm sun. Add, remove or edit a light and the look reads Custom: your own changes on top of it.
Screenshot of kreatorflow.ai, 2026-11-06 - 2
Add or shape a key, fill or rim light
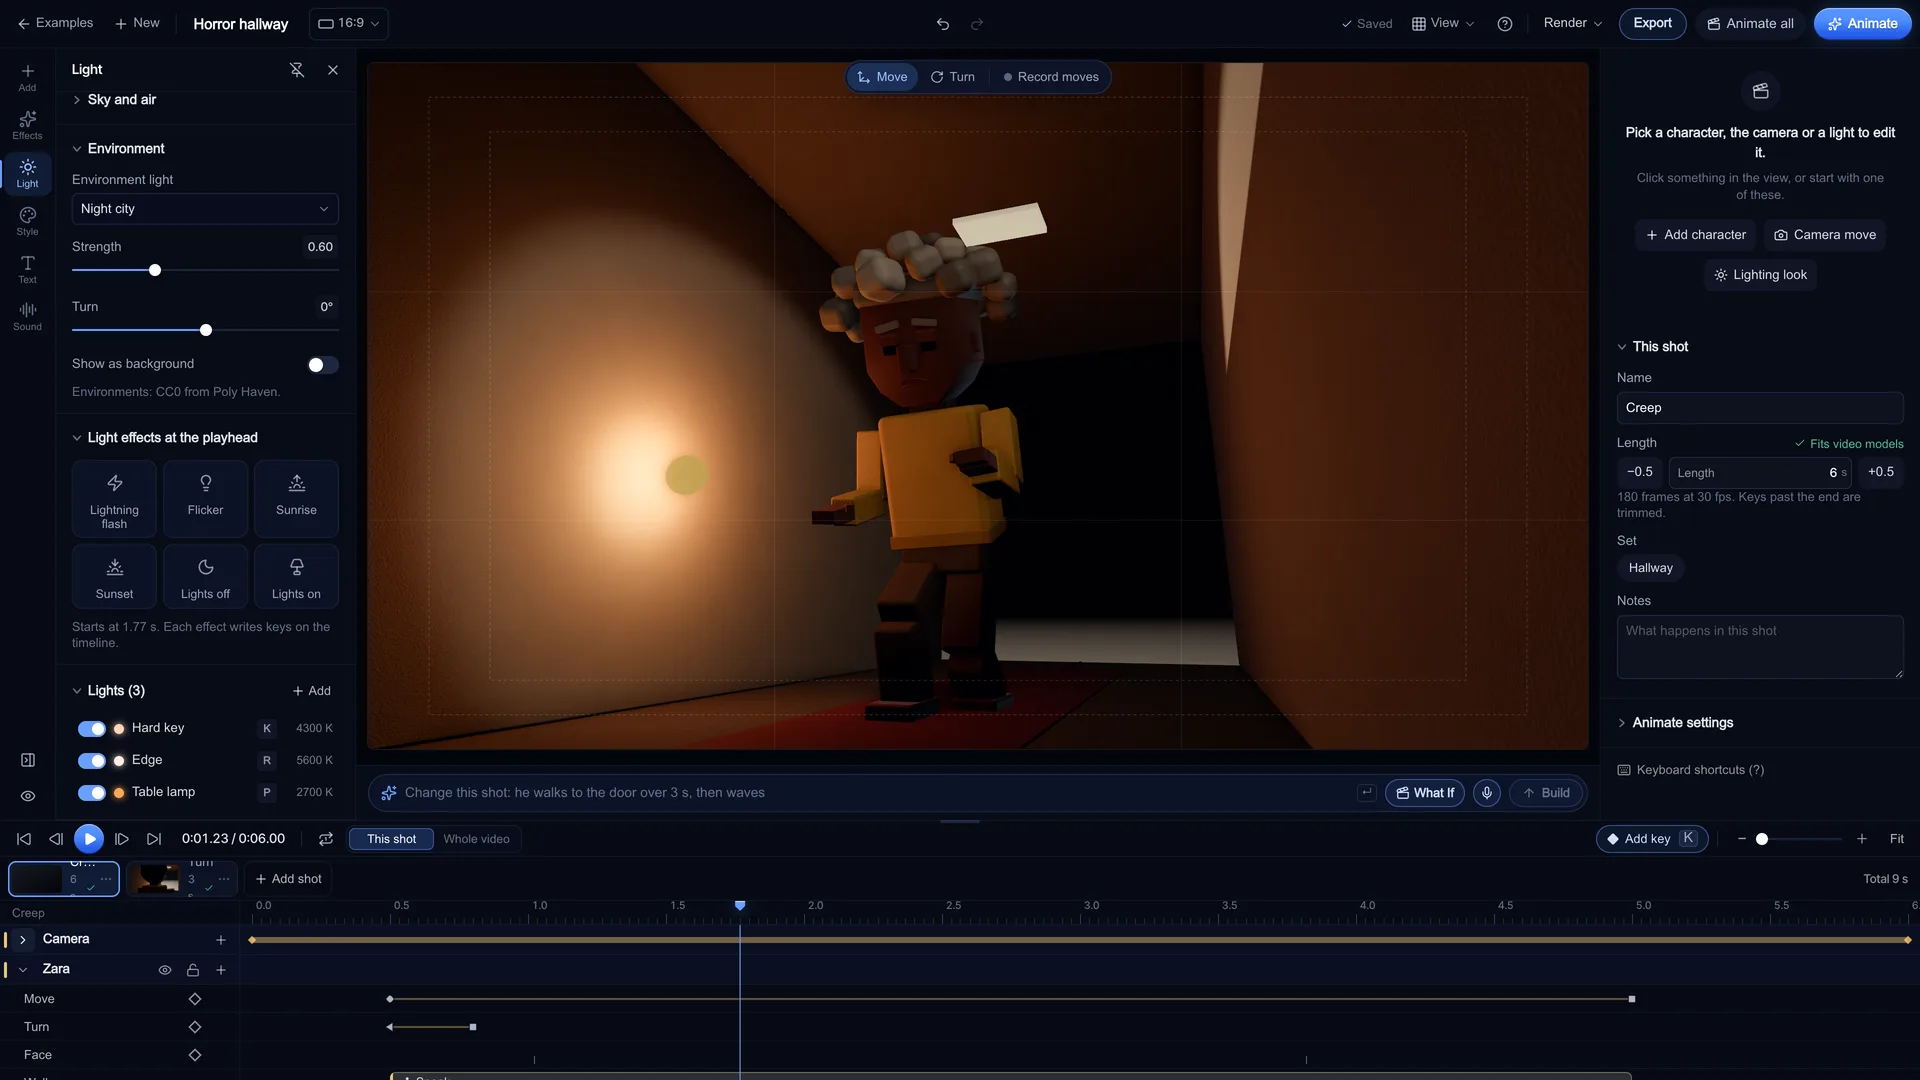
Under Lights, press Add, or click a Practicals tile (Table lamp (2700 K), Ceiling light (3200 K), Street light (sodium 2000 K), Neon sign (pink gel), TV glow (6500 K, blue), Candle (1800 K) and Moon rim (7500 K rim)) to drop a lamp next to the selected character. Click a light to open it in the inspector: set Type (Sun, Spot, Lamp, Softbox and Sky fill), Role (Key, Fill, Rim, Practical, Bounce and Accent), Brightness and Colour temperature from 1500 K (candle warm) to 12000 K (cool sky blue), then a Gel on top. Under Shape and shadows, Softness makes the light and its shadows softer, Spread and Soft edge shape a spot, and Casts shadows is worth keeping on the key light. Drag the light in the viewport or type its Position and Aims at.
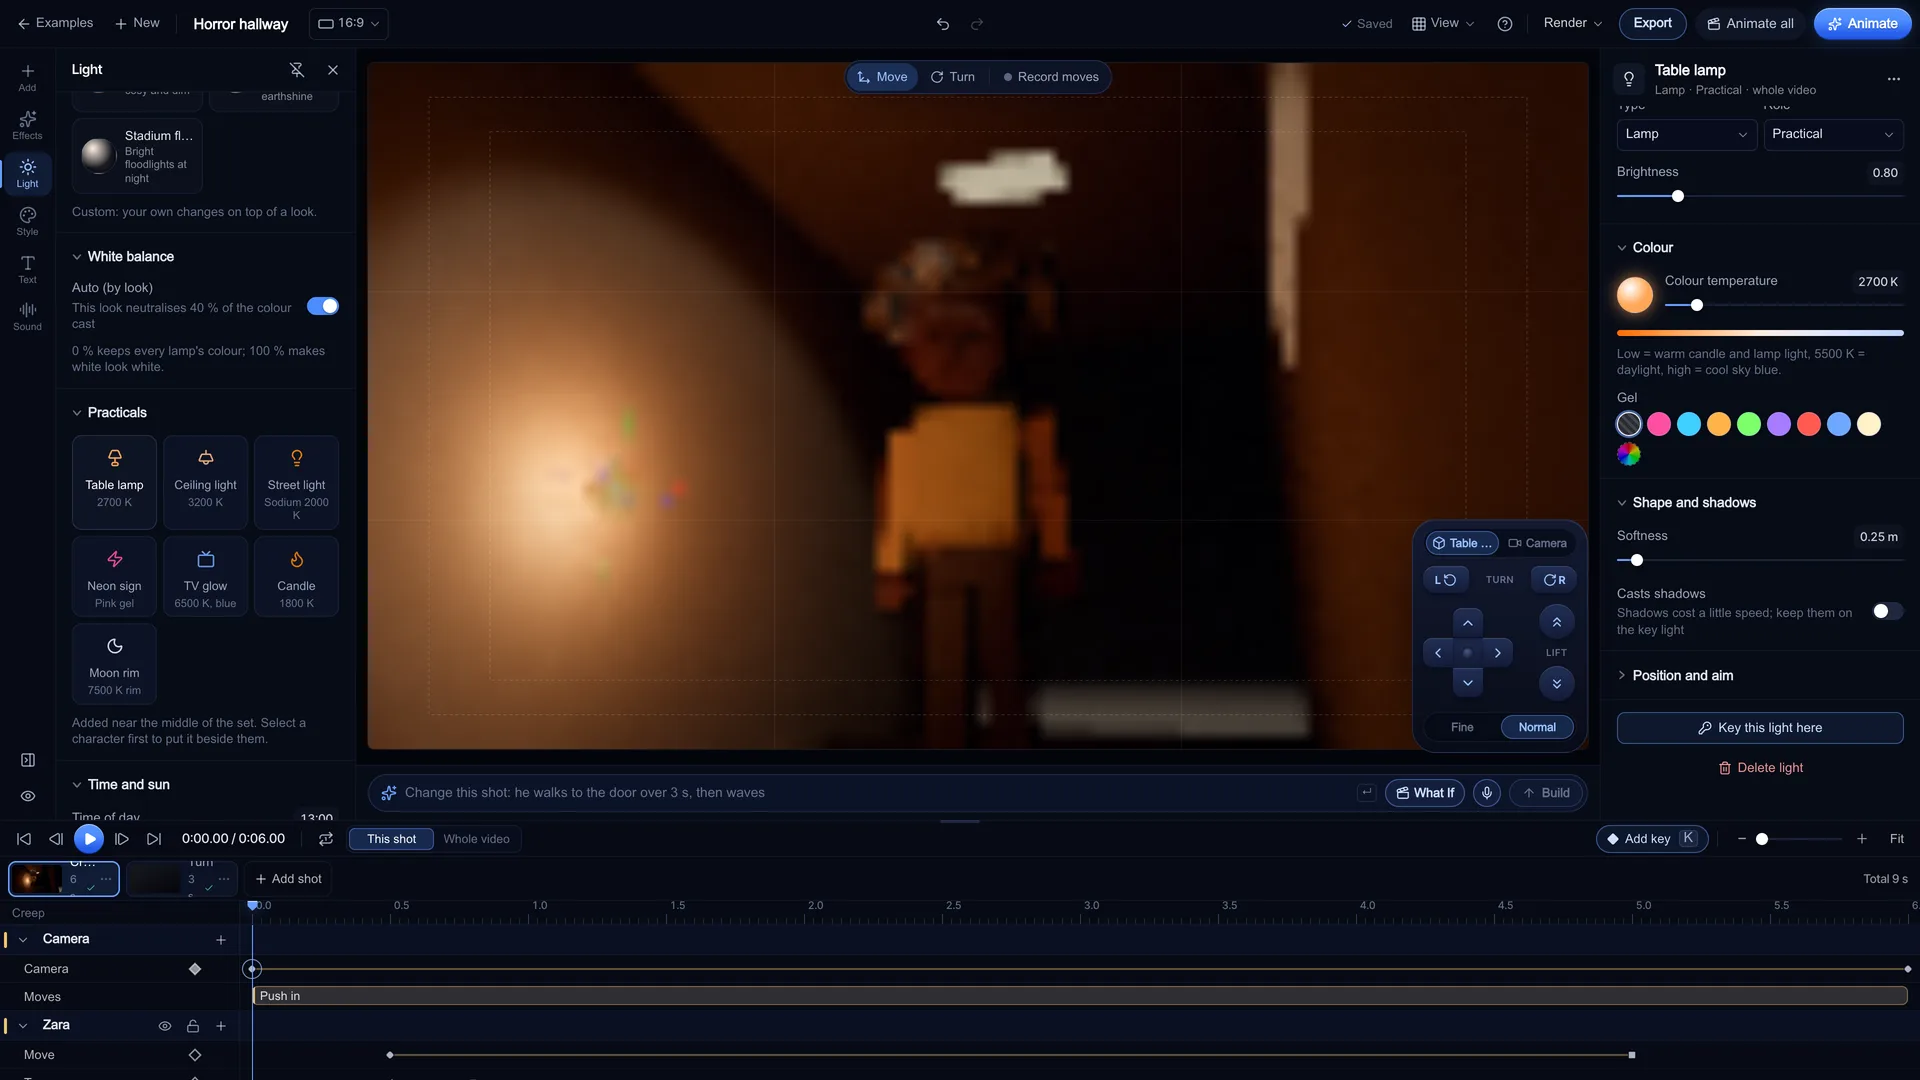
Screenshot of kreatorflow.ai, 2026-11-06 - 3
Set the environment and the time of day
In Time and sun, drag Time of day (00:00 to 24:00) and Sun direction; on outdoor sets the sun height and sky colour follow. In Environment, pick an Environment light (Small studio, Golden field, Clear day, Overcast, Sunset sky, Night city and Interior lamps), set its Strength and Turn, and switch Show as background on if you want it visible behind the set. Sky and air holds the sky and horizon colours, Ambient light, Shadow softness and Haze for depth.
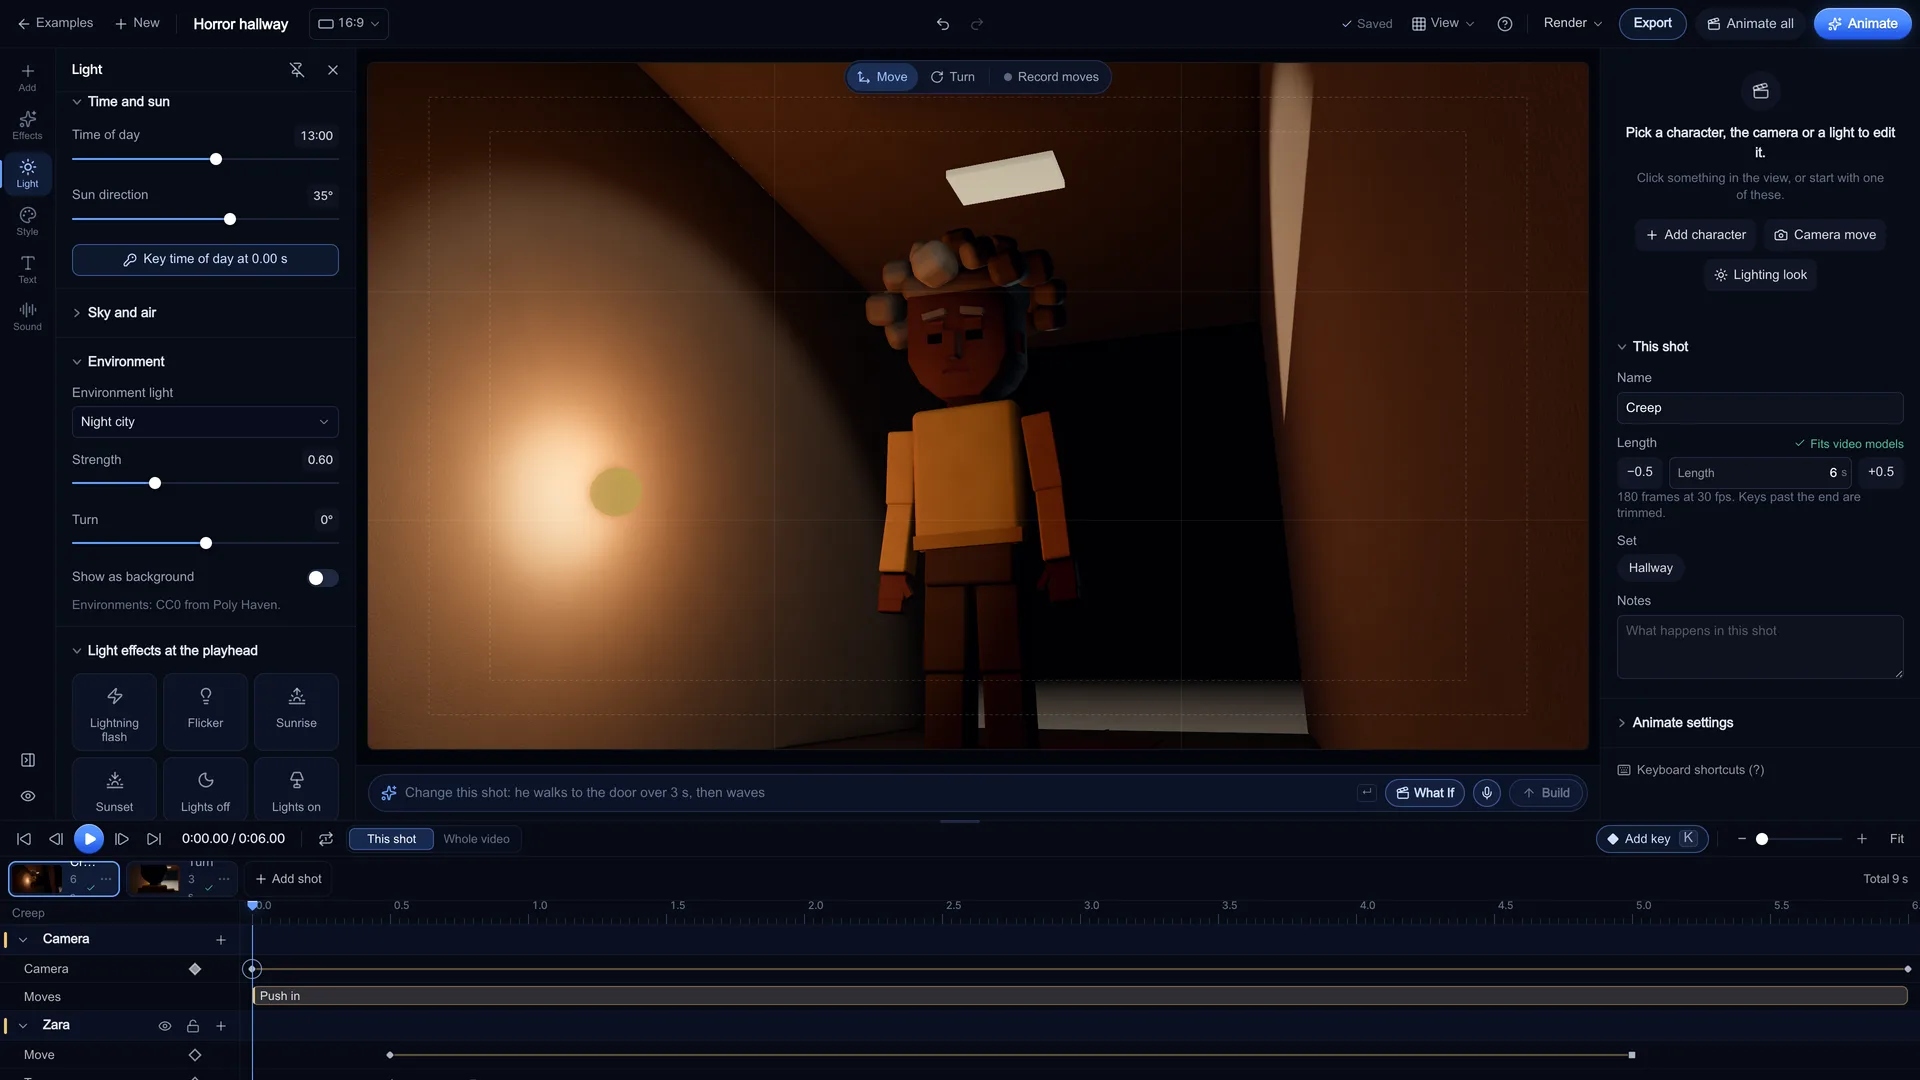
Screenshot of kreatorflow.ai, 2026-11-06 - 4
Give one shot its own lighting
At the top of the Lighting tab, Applies to sets where your change lands: Whole video (every shot without its own lighting), This shot (only the shot you are on) or This set (every shot on that set, as one). Use This shot for the one reverse angle that needs a stronger rim, without touching the rest.
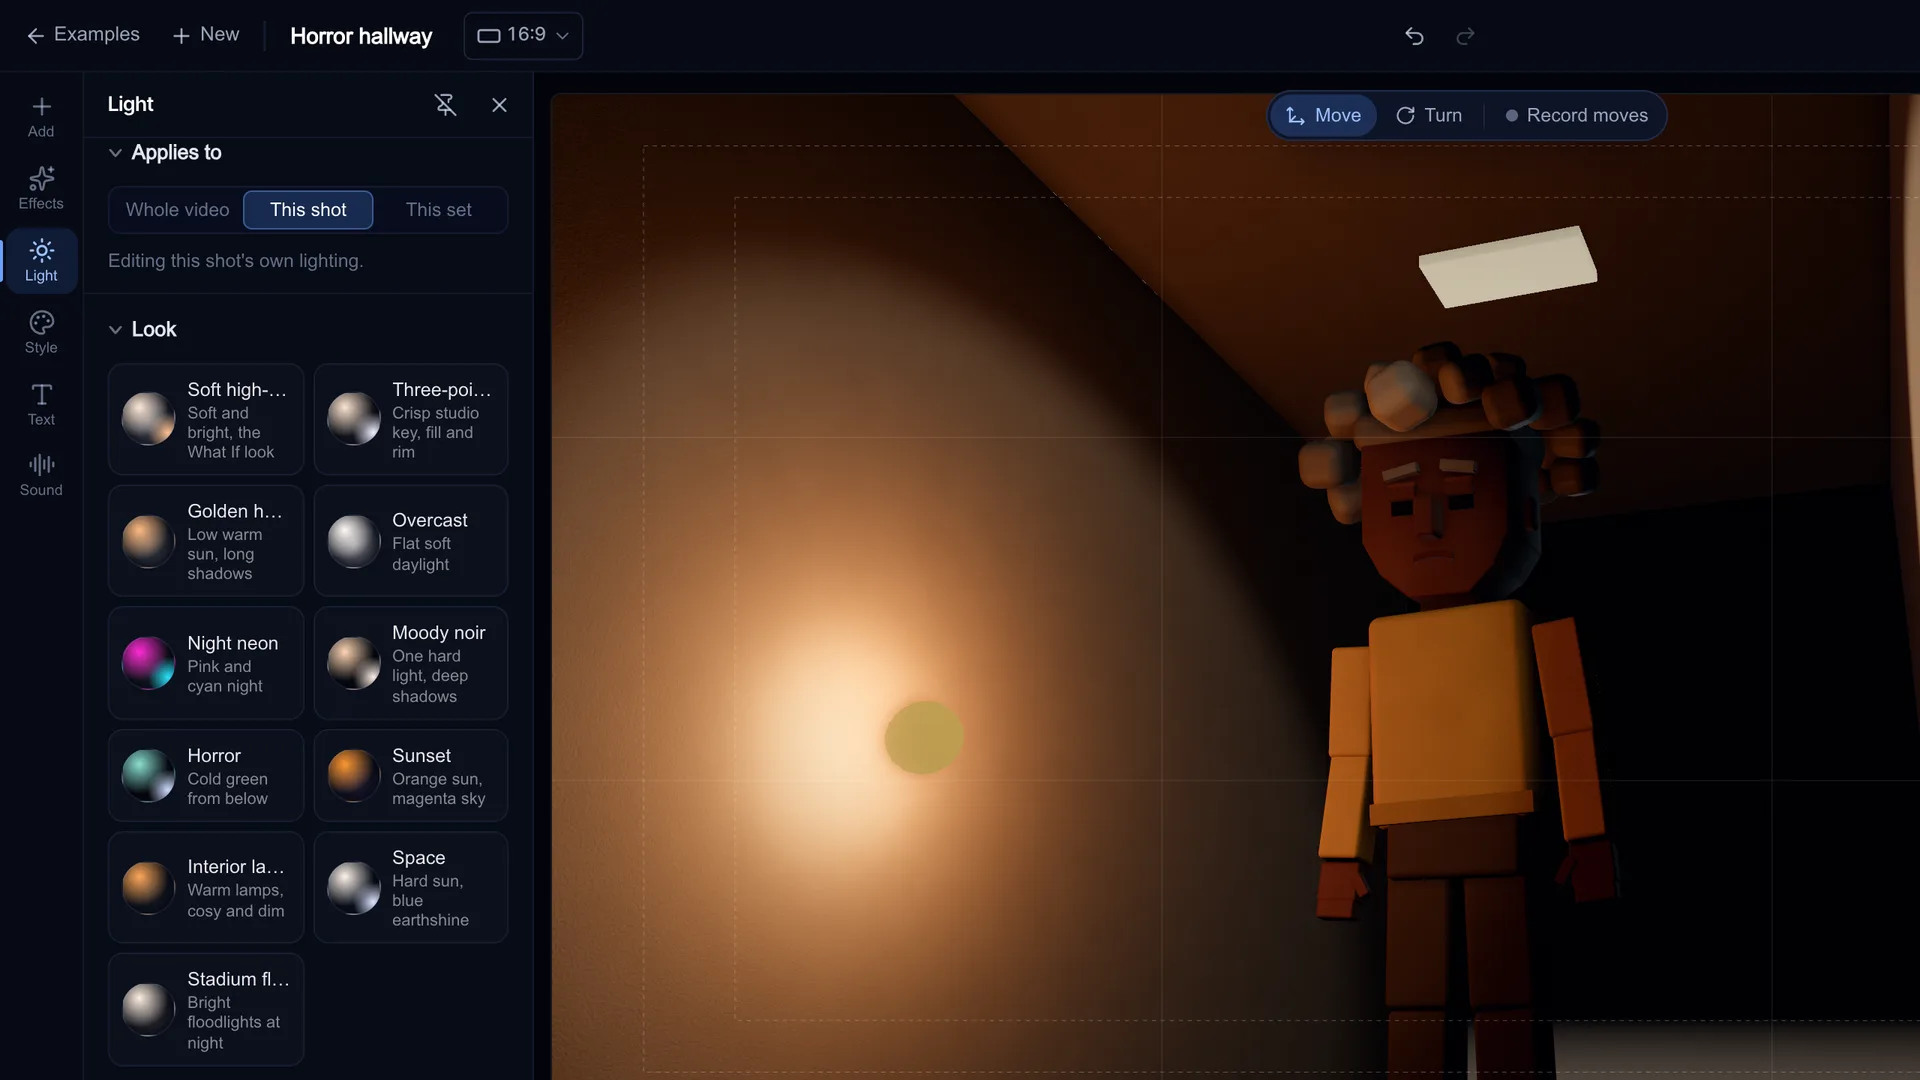
Screenshot of kreatorflow.ai, 2026-11-06 - 5
Animate the light with keys
Move the playhead and click a tile in Light effects at the playhead: Lightning flash, Flicker, Sunrise, Sunset, Lights off and Lights on. Each one writes keys you can see and drag on the Lights lane. For your own moves, select a light and press Key this light here to key its brightness, on/off and colour, or press Key time of day to animate a sunrise across the shot.
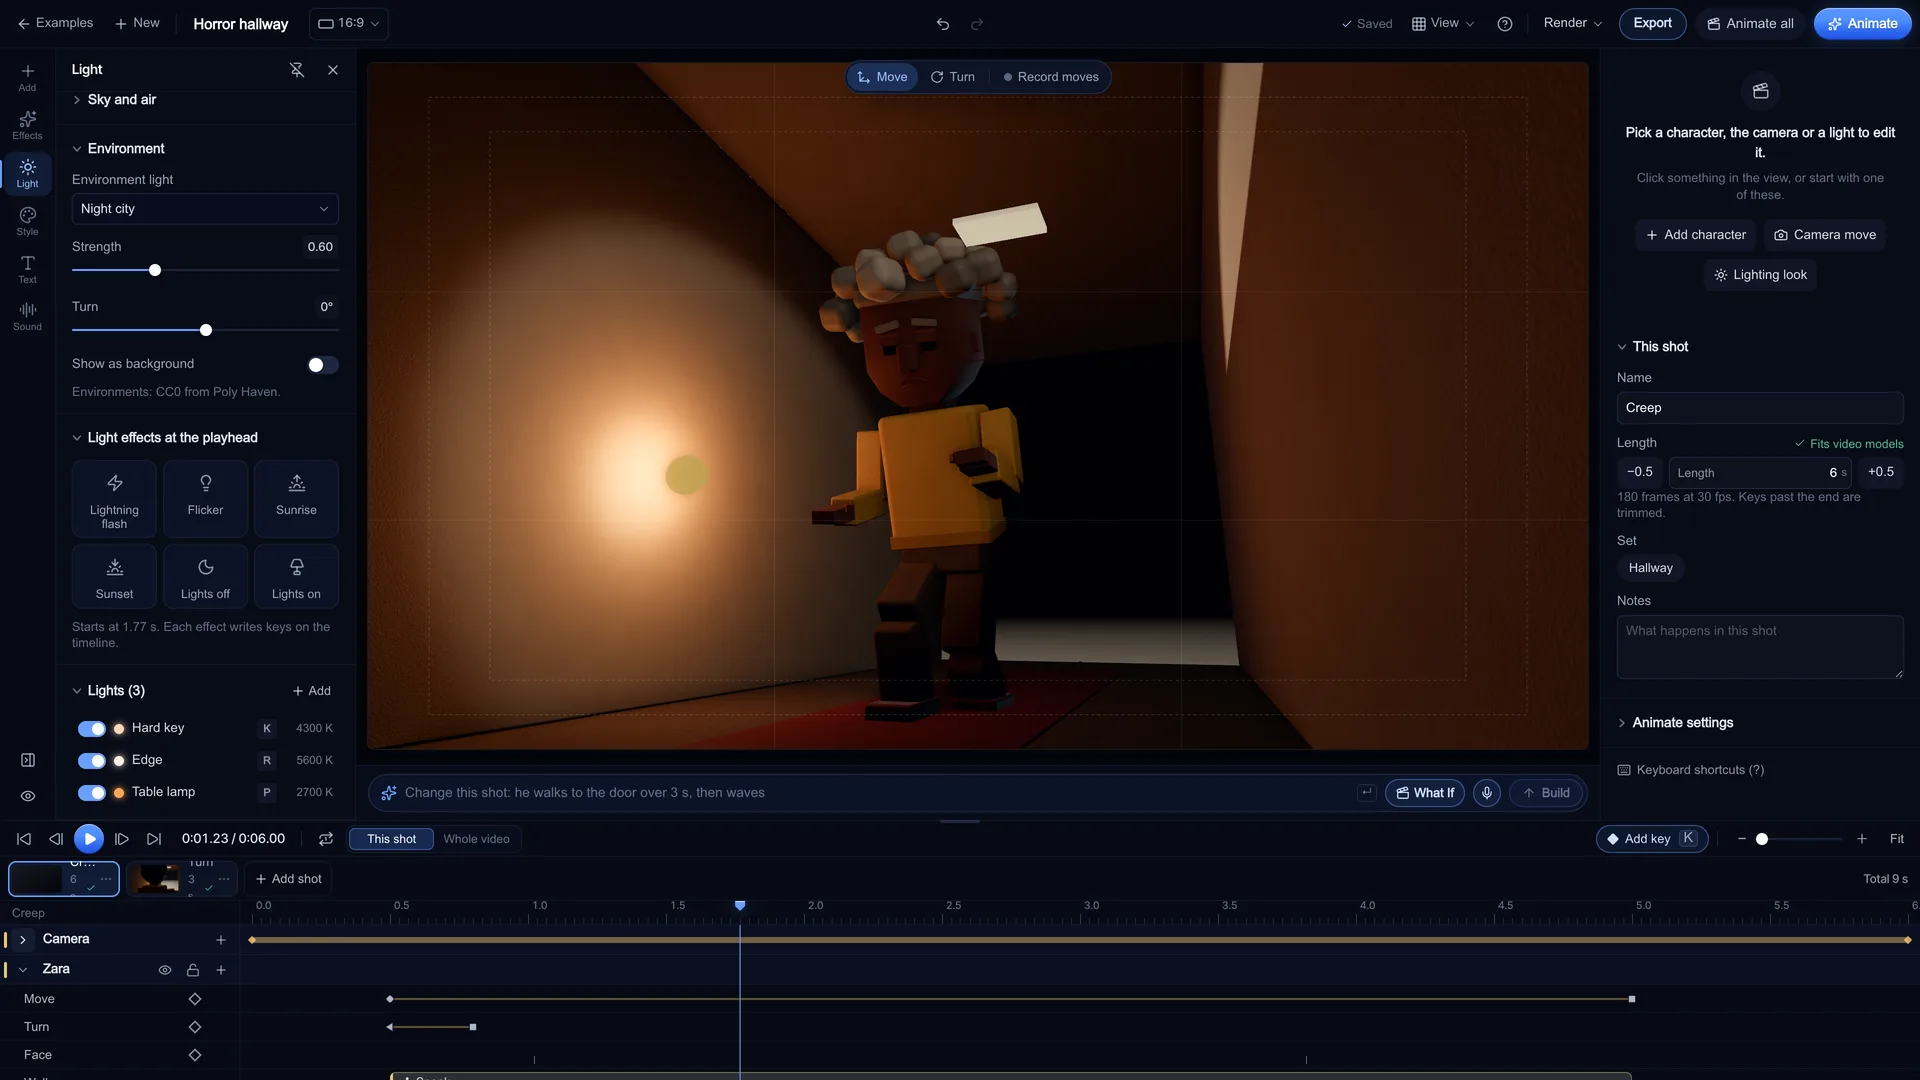
Screenshot of kreatorflow.ai, 2026-11-06 - 6
Grade and finish the frame
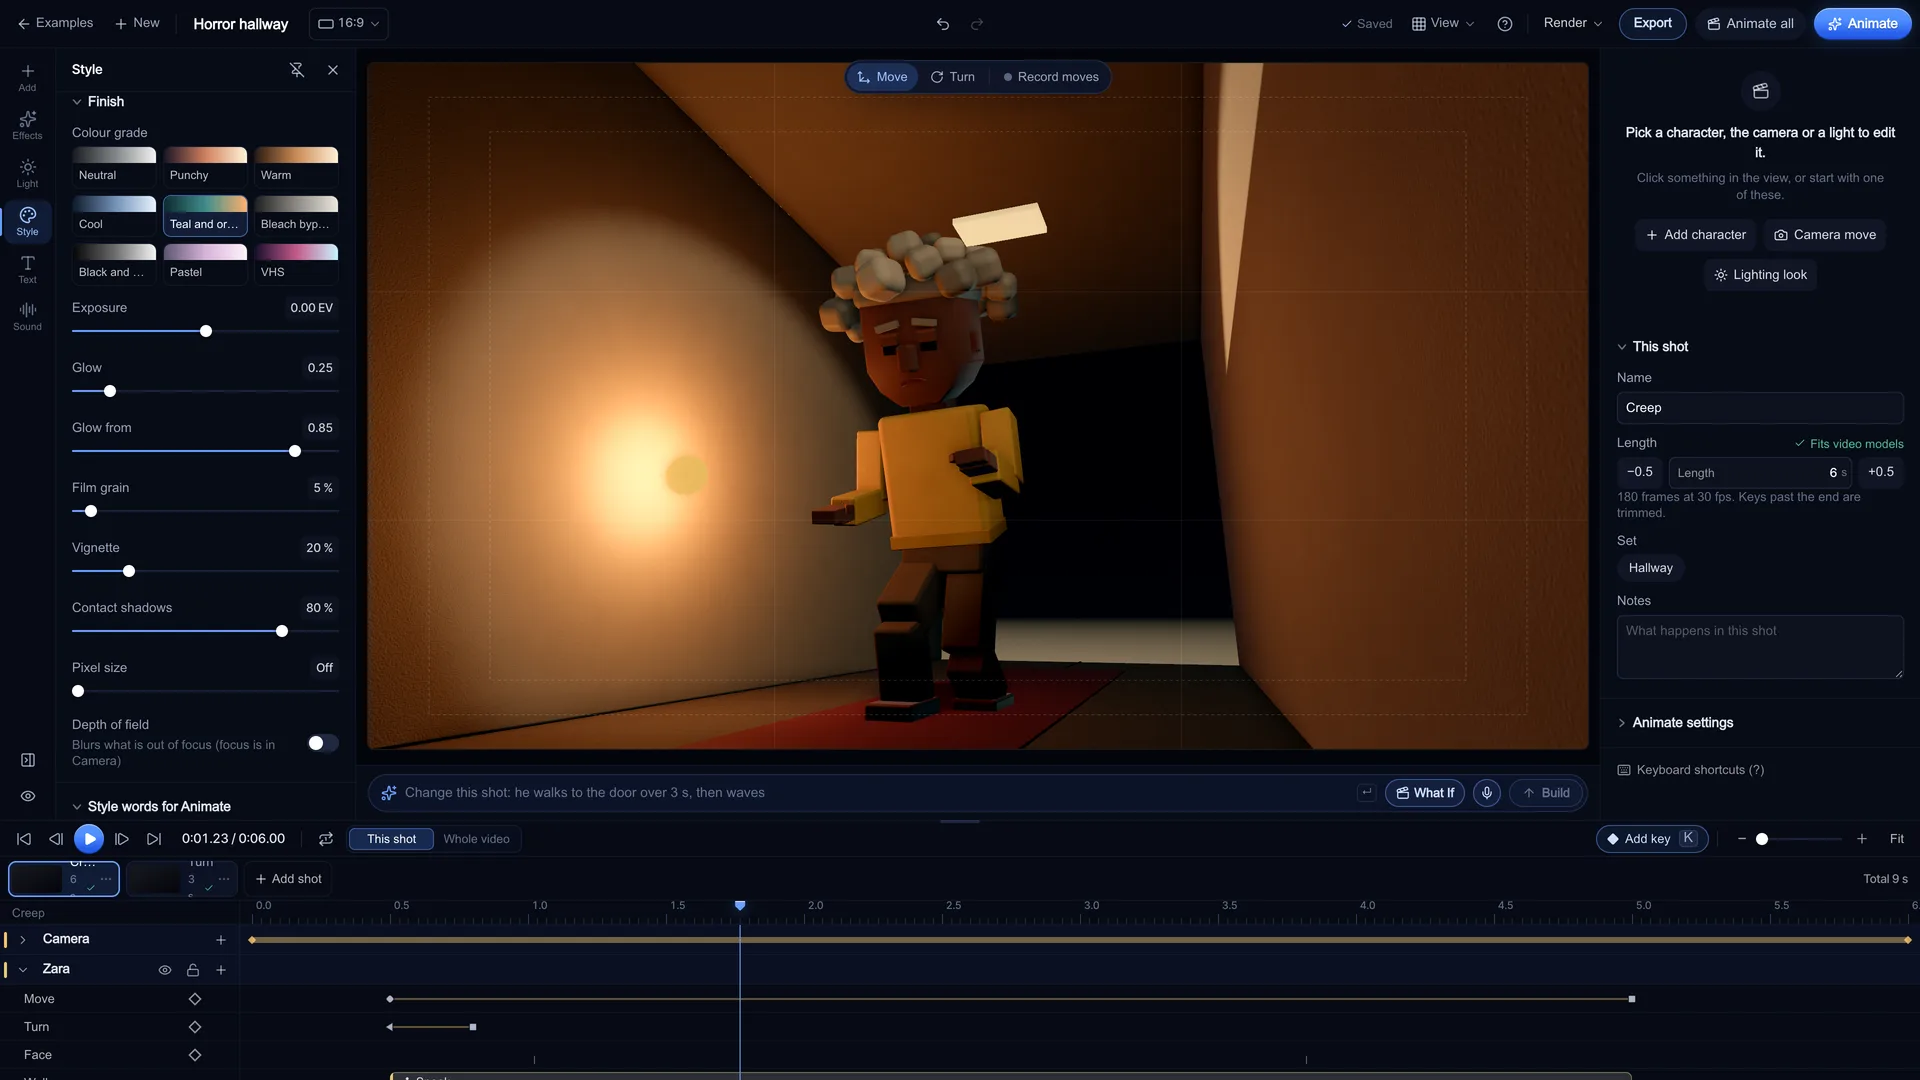
On the Style tab, Finish holds Exposure, Glow (bloom), Film grain, Vignette, Depth of field, Pixel size and Colour grade: Neutral, Film, Punchy, Warm, Cool, Teal and orange, Bleach bypass, Black and white, Pastel and VHS. The viewport uses filmic tone mapping, so bright lamps roll off instead of clipping. Turn Draft off before you judge the light: Draft hides shadows and post effects to keep blocking fast.
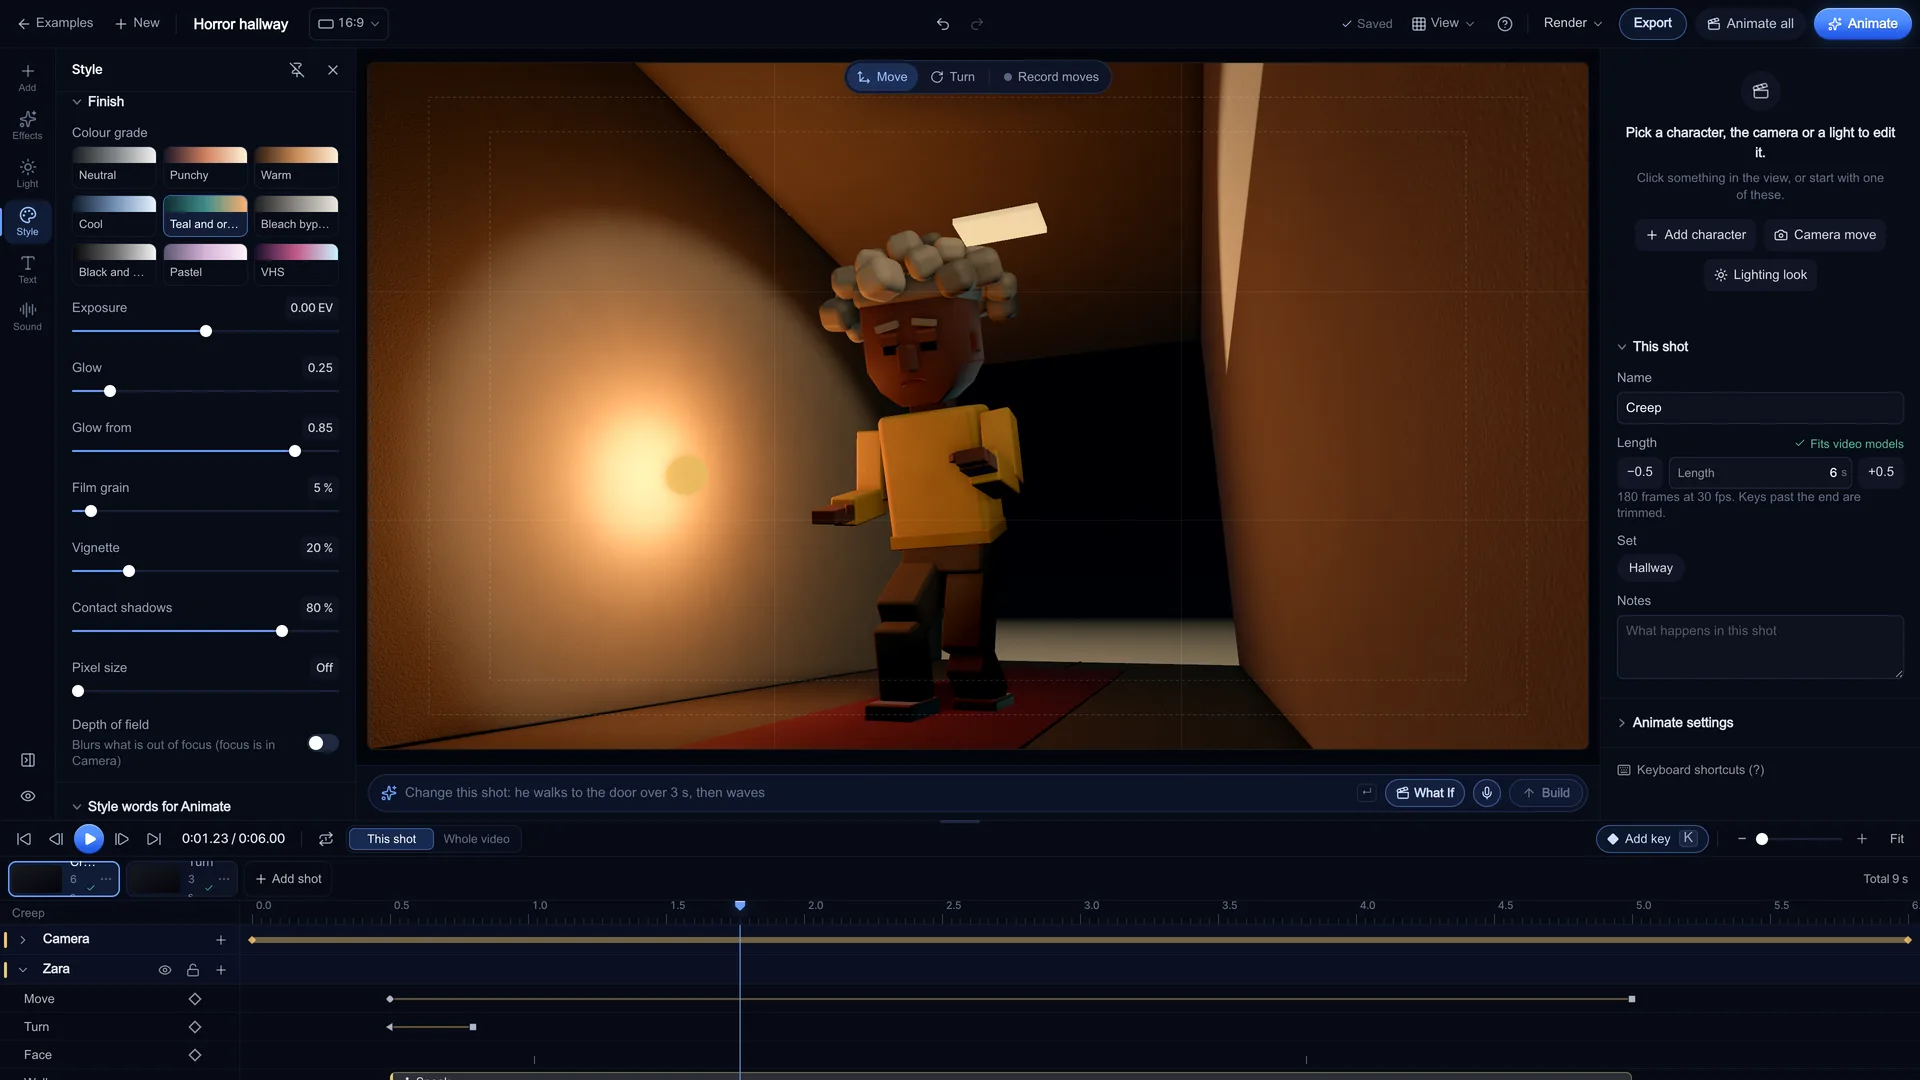
Screenshot of kreatorflow.ai, 2026-11-06
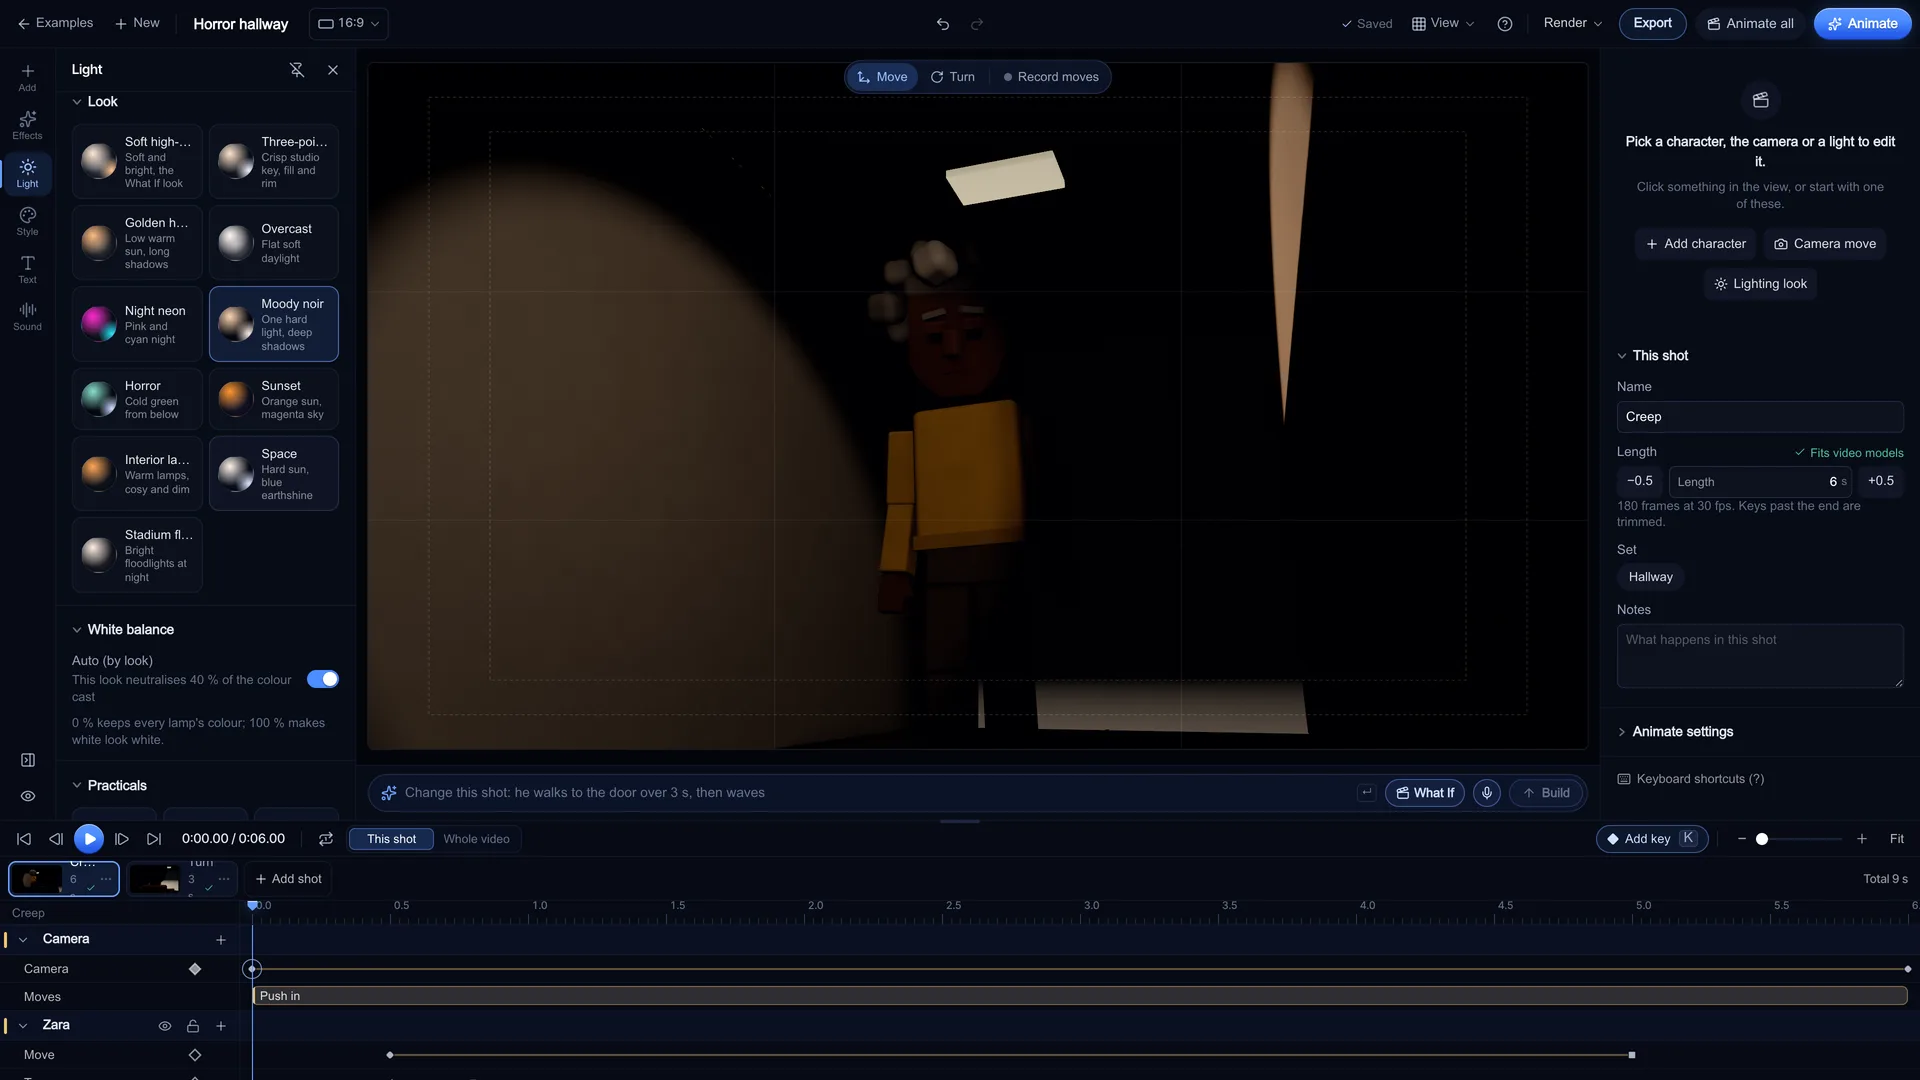
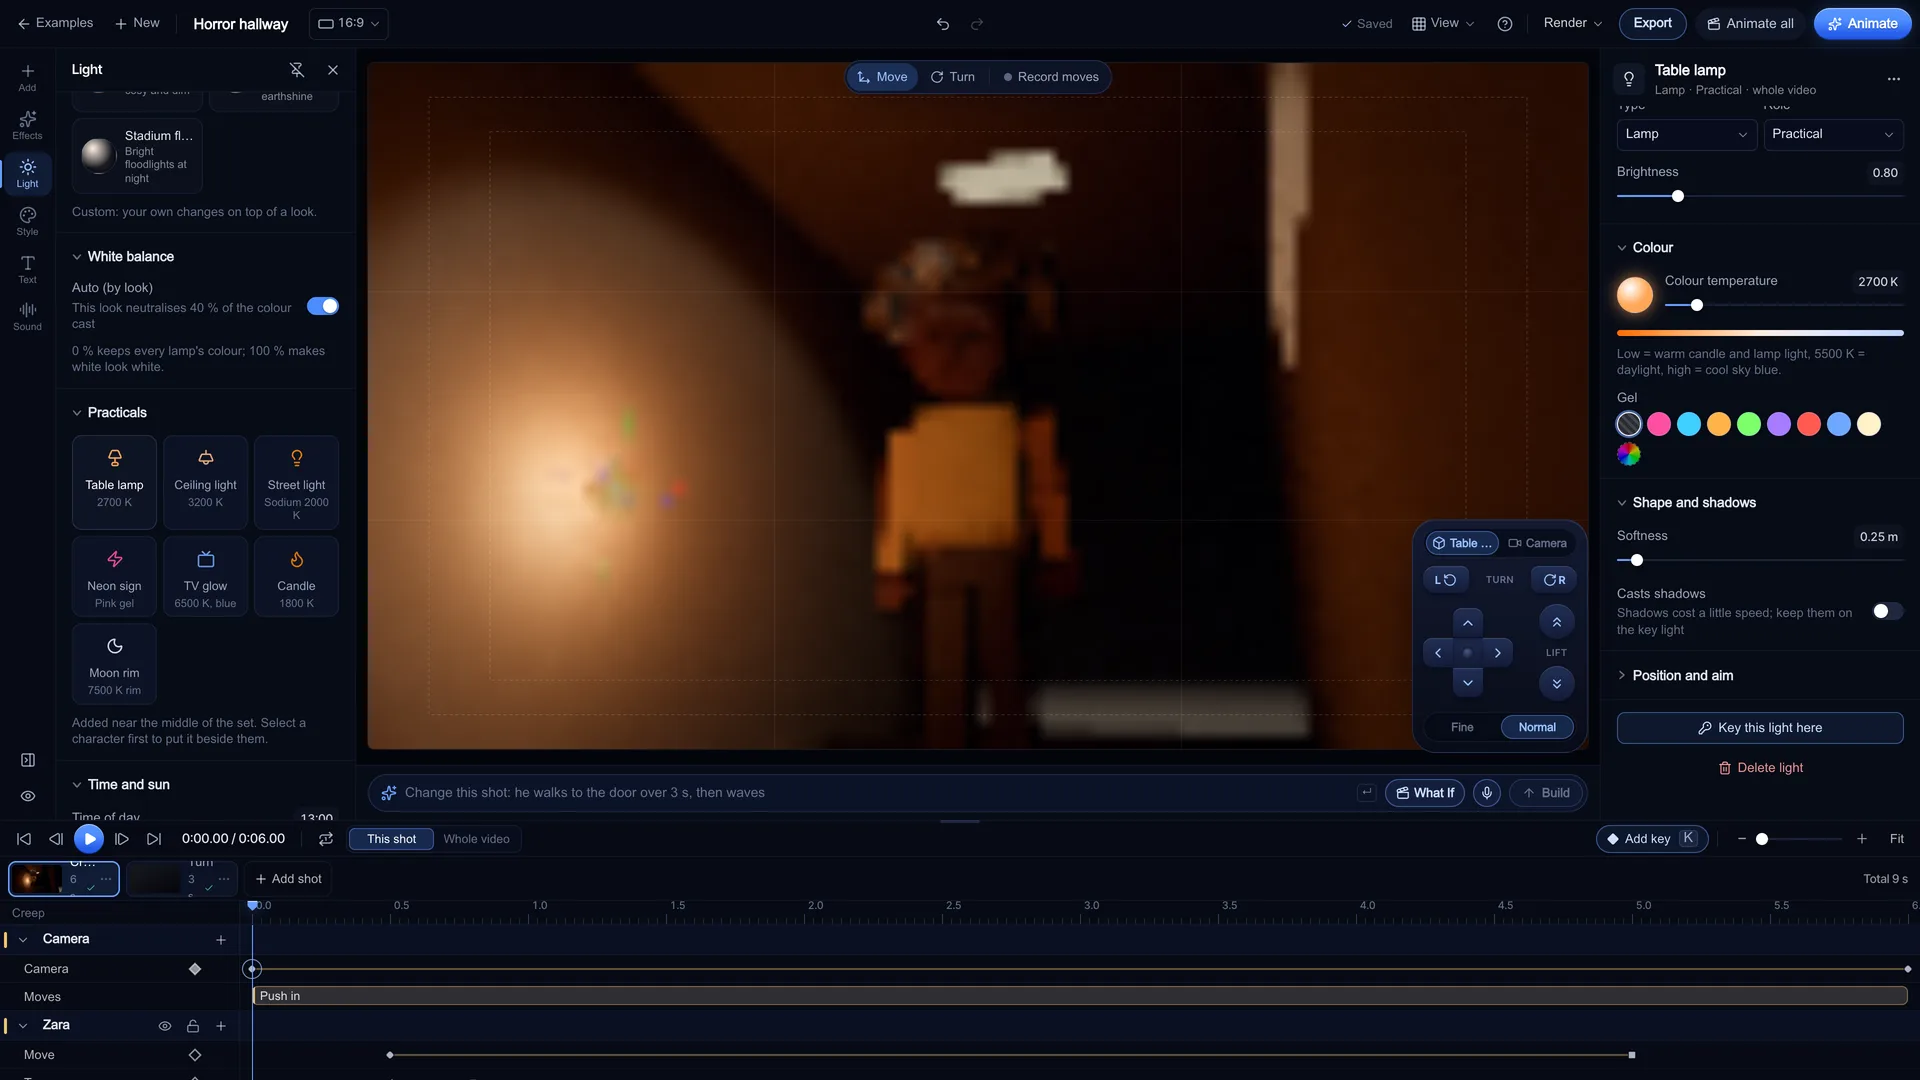
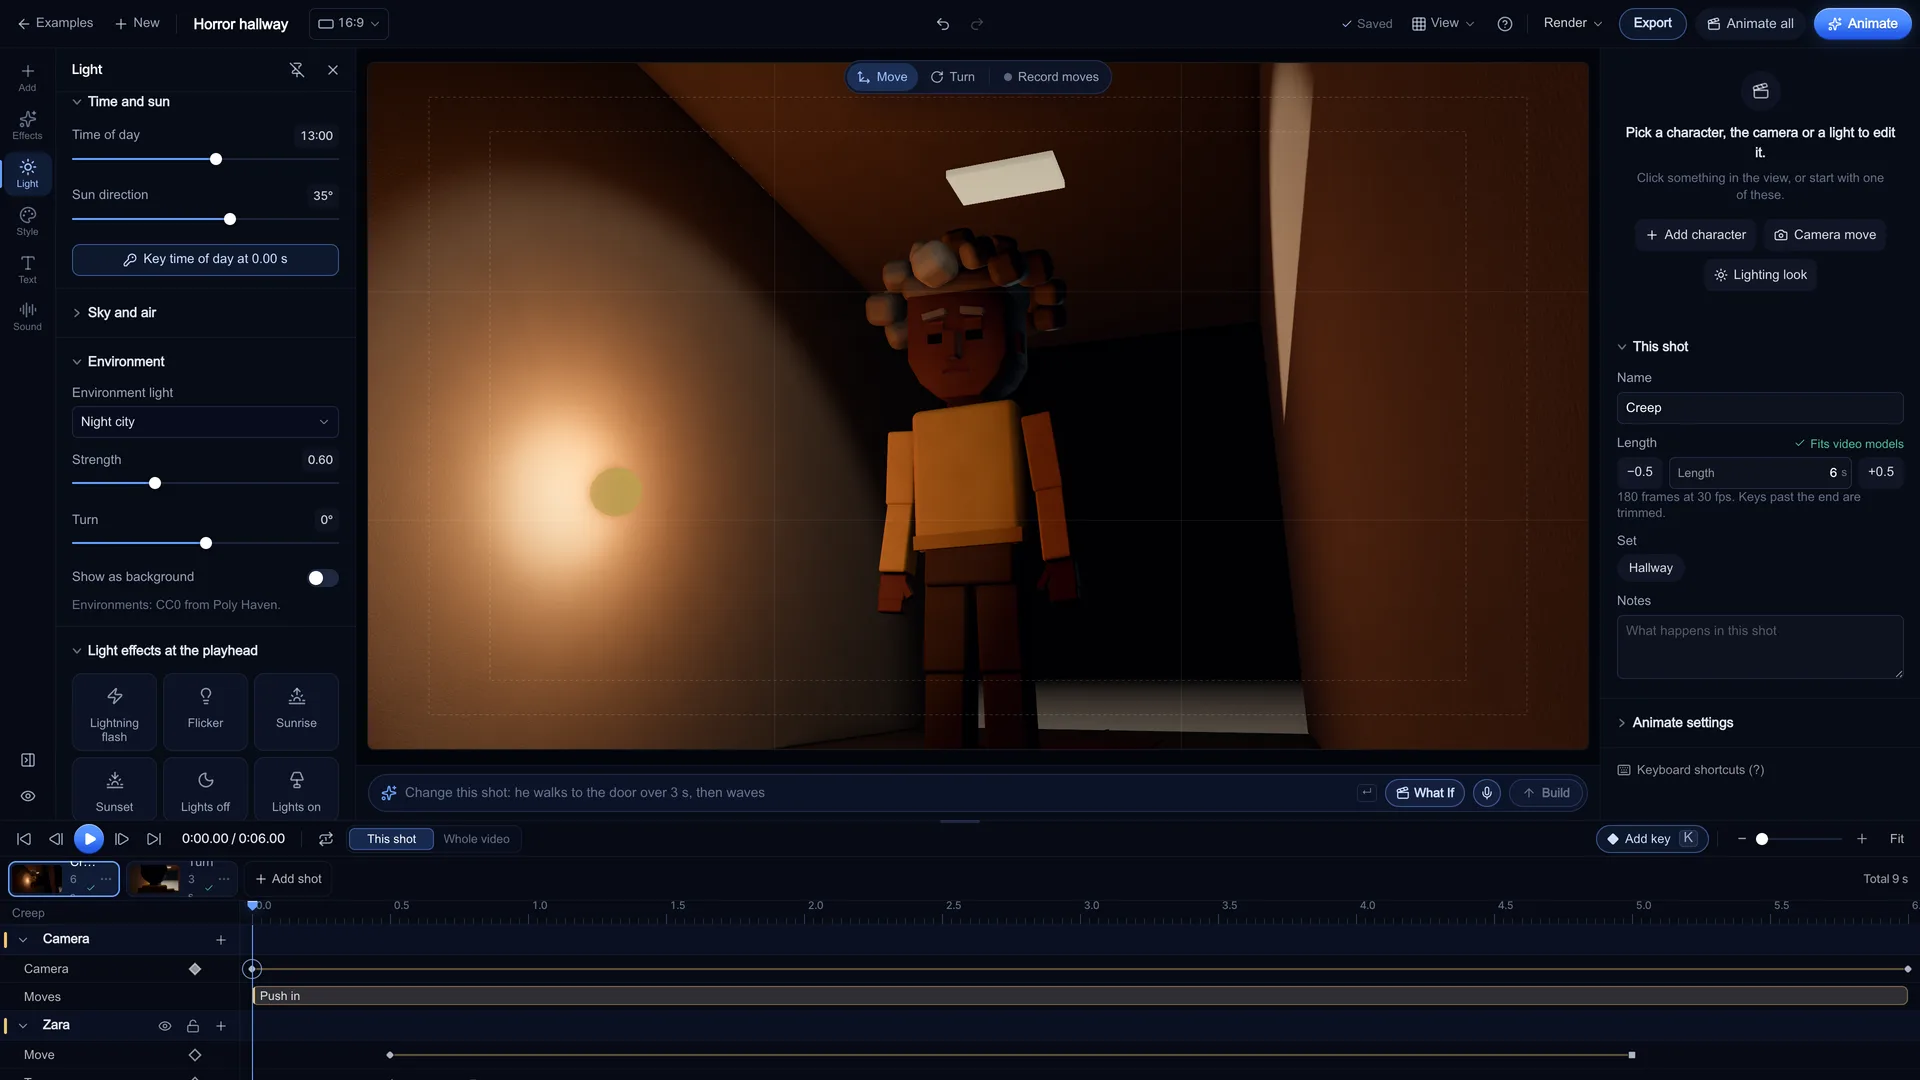
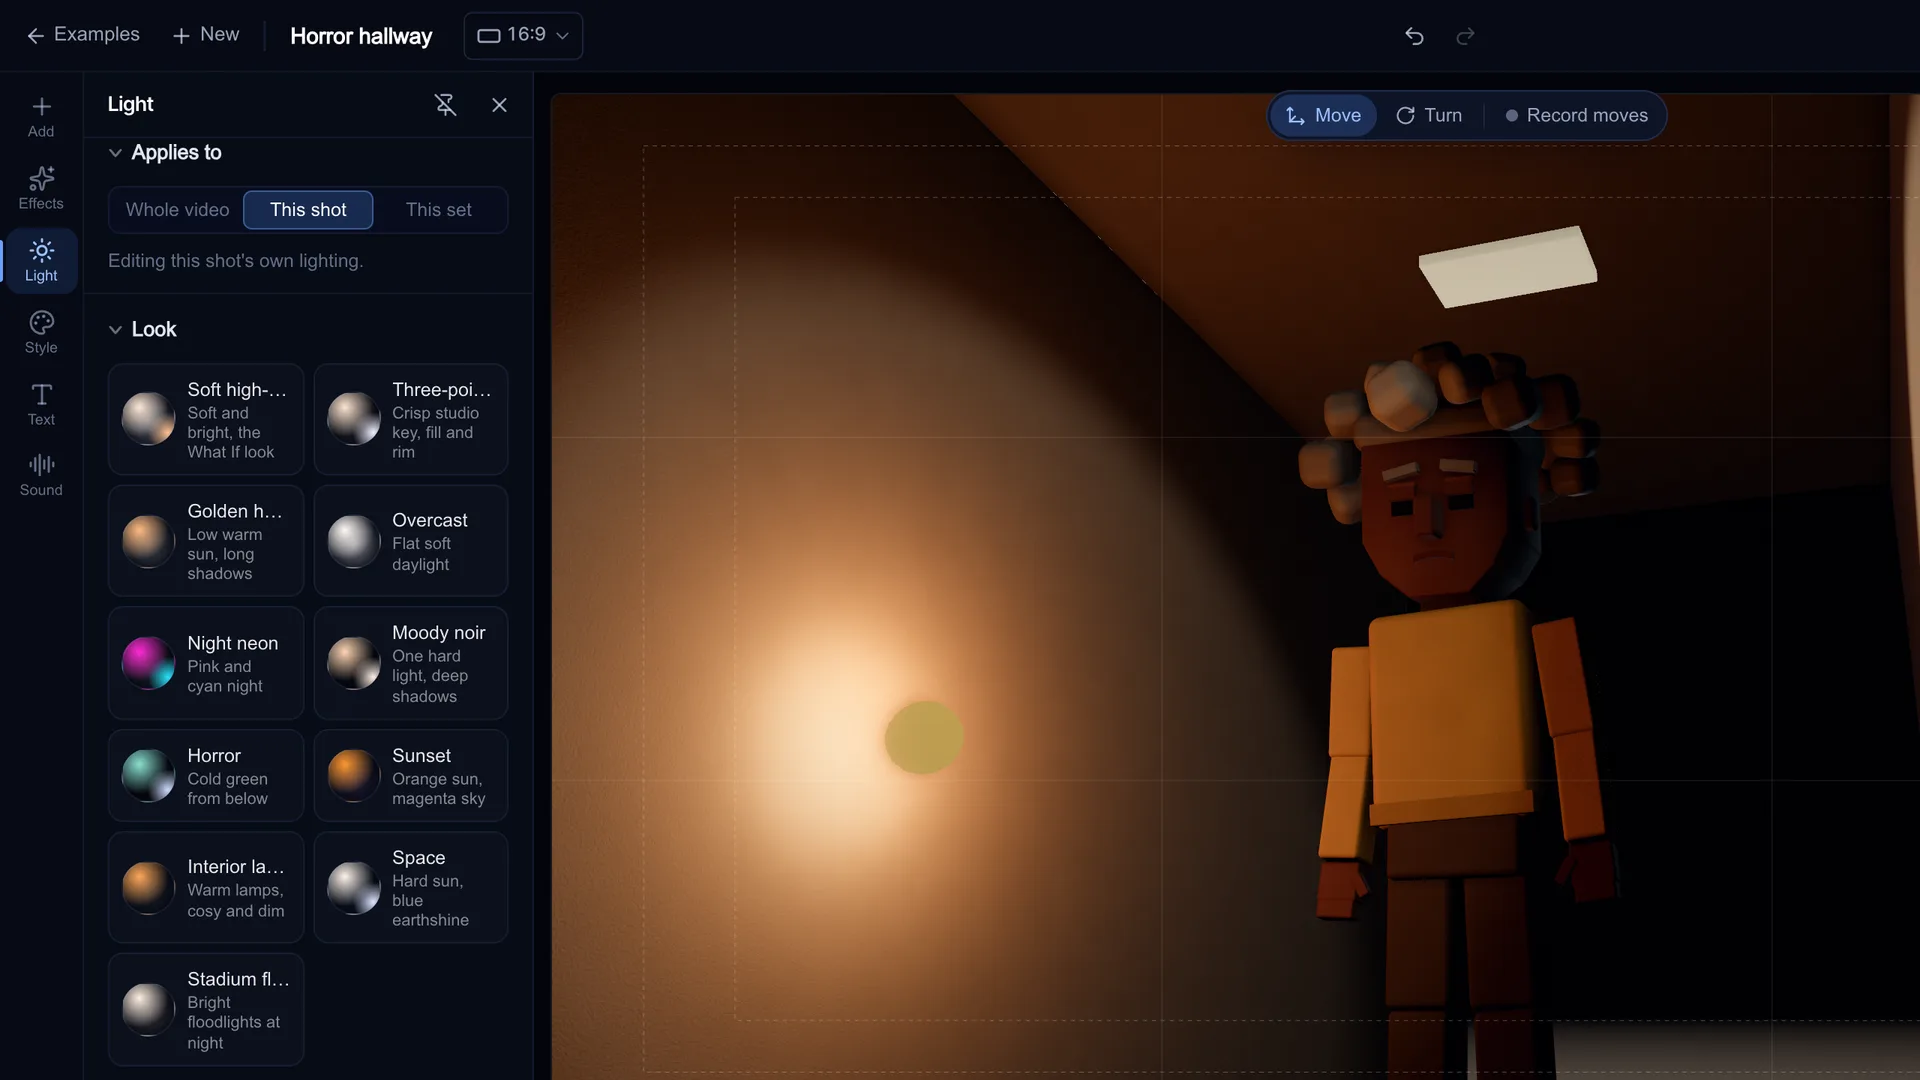
The 11 lighting looks in Stage
A look is a full lighting rig, not a filter: it places real lights in the set, so shadows fall the right way when you move the camera. Pick the closest one first, then adjust.
- Soft high-key: soft and bright
- Three-point studio: crisp studio key, fill and rim
- Golden hour: low warm sun, long shadows
- Overcast: flat soft daylight
- Night neon: pink and cyan night
- Moody noir: one hard light, deep shadows
- Horror: cold green from below
- Sunset: orange sun, magenta sky
- Interior lamps: warm lamps, cosy and dim
- Space: hard sun, blue earthshine
- Stadium floodlights: bright floodlights at night
Three-point lighting for AI video, the quick way
Three-point studio gives you the classic setup: a key light on one side of the face, a softer fill on the other, and a rim behind to separate the subject from the background. In the light list each light shows a letter for its role (K, F, R) and its Kelvin.
Two quick checks before you animate: keep the key on the side of the face the camera sees less of for a more cinematic look, and keep Casts shadows on the key only, because shadows cost a little speed.
- Key: the brightest light, sets the direction of the shadows
- Fill: lower Brightness, bigger Softness, lifts the dark side
- Rim: behind the subject, often cooler (higher Kelvin) for separation
Keep the look across every shot
Light the project once with Applies to set to Whole video. Every shot without its own lighting follows it, so every start frame in the sequence gets the same light. Use This set when several shots share a location.
The Style tab does the same for the look of the cast and props: a style preset, proportions, material, outline, palette and Finish. Save it under My styles, and use Export style file to carry it into another project. Style words for Animate are sent to the video model so it keeps your look.
Lighting a night scene that the AI model can read
Night scenes fail when the start frame is too dark to show the subject. Pick Night neon, Moody noir or Stadium floodlights instead of just lowering the brightness, add a Moon rim or Street light practical to outline the character, and keep some Ambient light. Haze adds depth behind the subject. Check the result with Draft off.
Optional: an HQ still on your own GPU
HQ render renders the frame with realistic light bounces on your own graphics card. It asks first (Use your GPU for an HQ render?), warns that your device may get warm, stops by itself after a short render and can be stopped any time. Nothing leaves your device and it costs no credits. It is optional: the normal preview works without it.
From the lit frame to the AI video
KreatorFlow is an official partner of BytePlus, a ByteDance company. When the light is right, press Animate on the shot. Stage renders the start frame, snaps the length to what the model makes, writes the motion brief and opens Video with everything filled in. Nothing is spent until you press Generate in Video, where you see the cost first. A 5-second 720p Seedance 2.0 clip costs 15 credits.
| Model | 720p, 5 s | 1080p, 5 s |
|---|---|---|
| Seedance 2.0 | 15 credits | 30 credits |
| Seedance 2 Fast | 12 credits | 20 credits |
| Seedance 2.0 Mini | 9 credits | 17 credits |
| Seedance 2.5 | 24 credits | 50 credits |
Horror and Halloween light
The Horror look puts cold green light below the face. Add a Flicker on a lamp or a Lightning flash at the beat where the scare lands, and the keys show on the Lights lane so you can line them up with the sound.
Questions other guides skip
Does the light in my 3D scene actually reach the AI video?
Yes, two ways. Animate renders a clean start frame at the video's shape, so the model sees your light, shadows and colour. And the Motion brief is "written from your keyframes, camera and lights", so it names the look and where the key light sits. You can edit the brief before you press Generate here or Open in Video studio. Seedance starts from your start frame; there is no end frame, so describe how the light changes in the brief.
Why do my AI clips change lighting from shot to shot?
Usually because every clip starts from a different picture. Lighting the whole video once (Applies to: Whole video) and only overriding the shots that need it gives every start frame the same light direction and colour, which is the easiest way to keep a sequence matching.
Should I use a gel or change the colour temperature?
Use colour temperature for realistic light (warm lamps, daylight, cool sky) and a gel for colour that no real bulb makes, like the pink and cyan of Night neon. White balance on the Lighting tab decides how much of that colour the camera neutralises: 0 % keeps every lamp's colour, 100 % makes white look white.
Frequently asked questions
Does lighting in Stage carry into the AI clip?
Yes. Animate renders your start frame with the lighting you set, and the motion brief describes the lighting too. The video model starts from that frame, so its light, shadows and colour are where the clip begins.
Does the HQ render cost credits?
No. HQ render runs on your own graphics card, after you agree in a dialog, and nothing leaves your device. Credits are only spent when you confirm a generation, a video or KreatorFlow voice lines.
How do I light a night scene for AI video?
Start from Night neon, Moody noir or Stadium floodlights, add a Moon rim or Street light practical to outline the character, keep some Ambient light so the subject is readable, and add Haze for depth.
Can I animate the lights?
Yes. Light effects at the playhead write keys for lightning flash, flicker, sunrise, sunset, lights off and lights on, and Key this light here keys a light's brightness, on/off and colour. You can also key the time of day for a sunrise or sunset.
Can I use HDRI lighting in the browser?
Yes. Stage has 7 bundled CC0 environments from Poly Haven, with Strength, Turn and Show as background controls. It runs in the browser on your own GPU.
Is lighting in Stage free?
Yes. Planning, lighting and previewing are free and work in your browser. Generating the video spends credits, and you see the cost before you press Generate.