Get started
How to keyframe a camera move in Stage
- 1
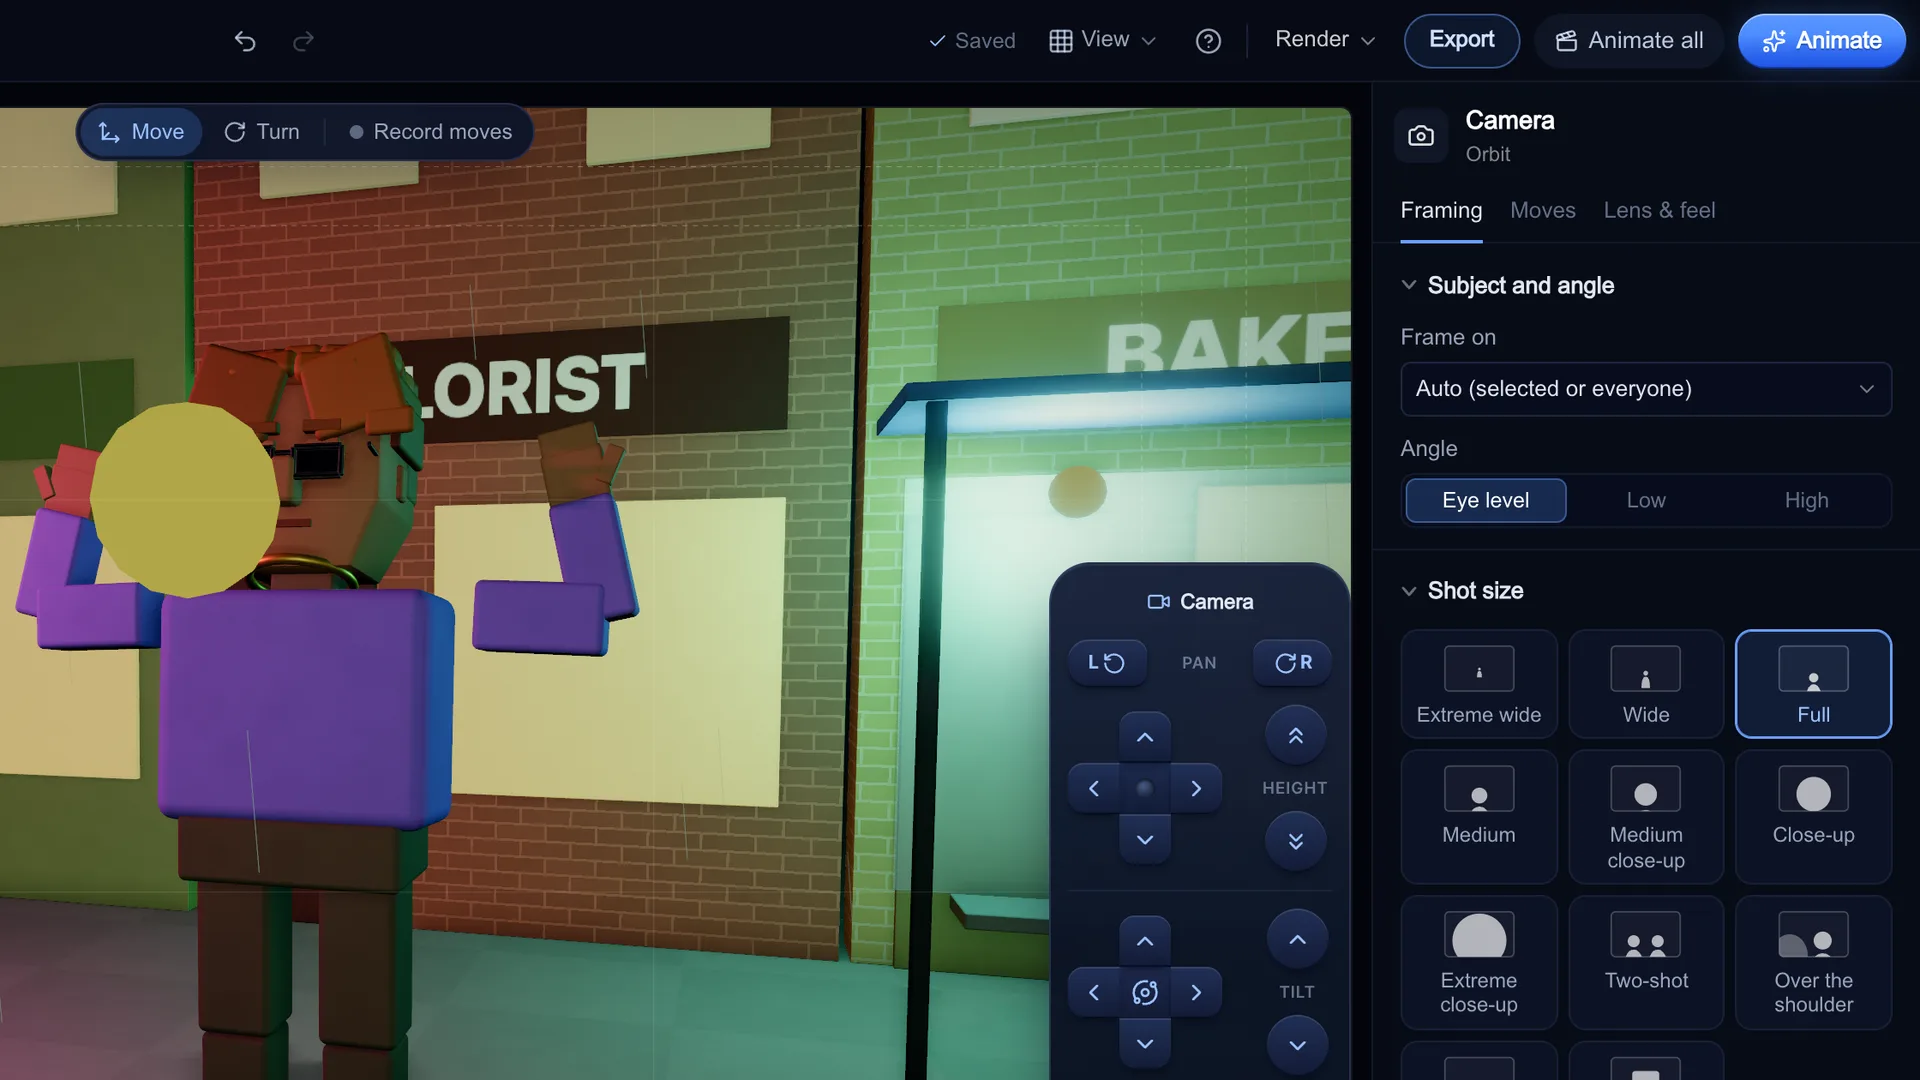
Pick a framing from the subject
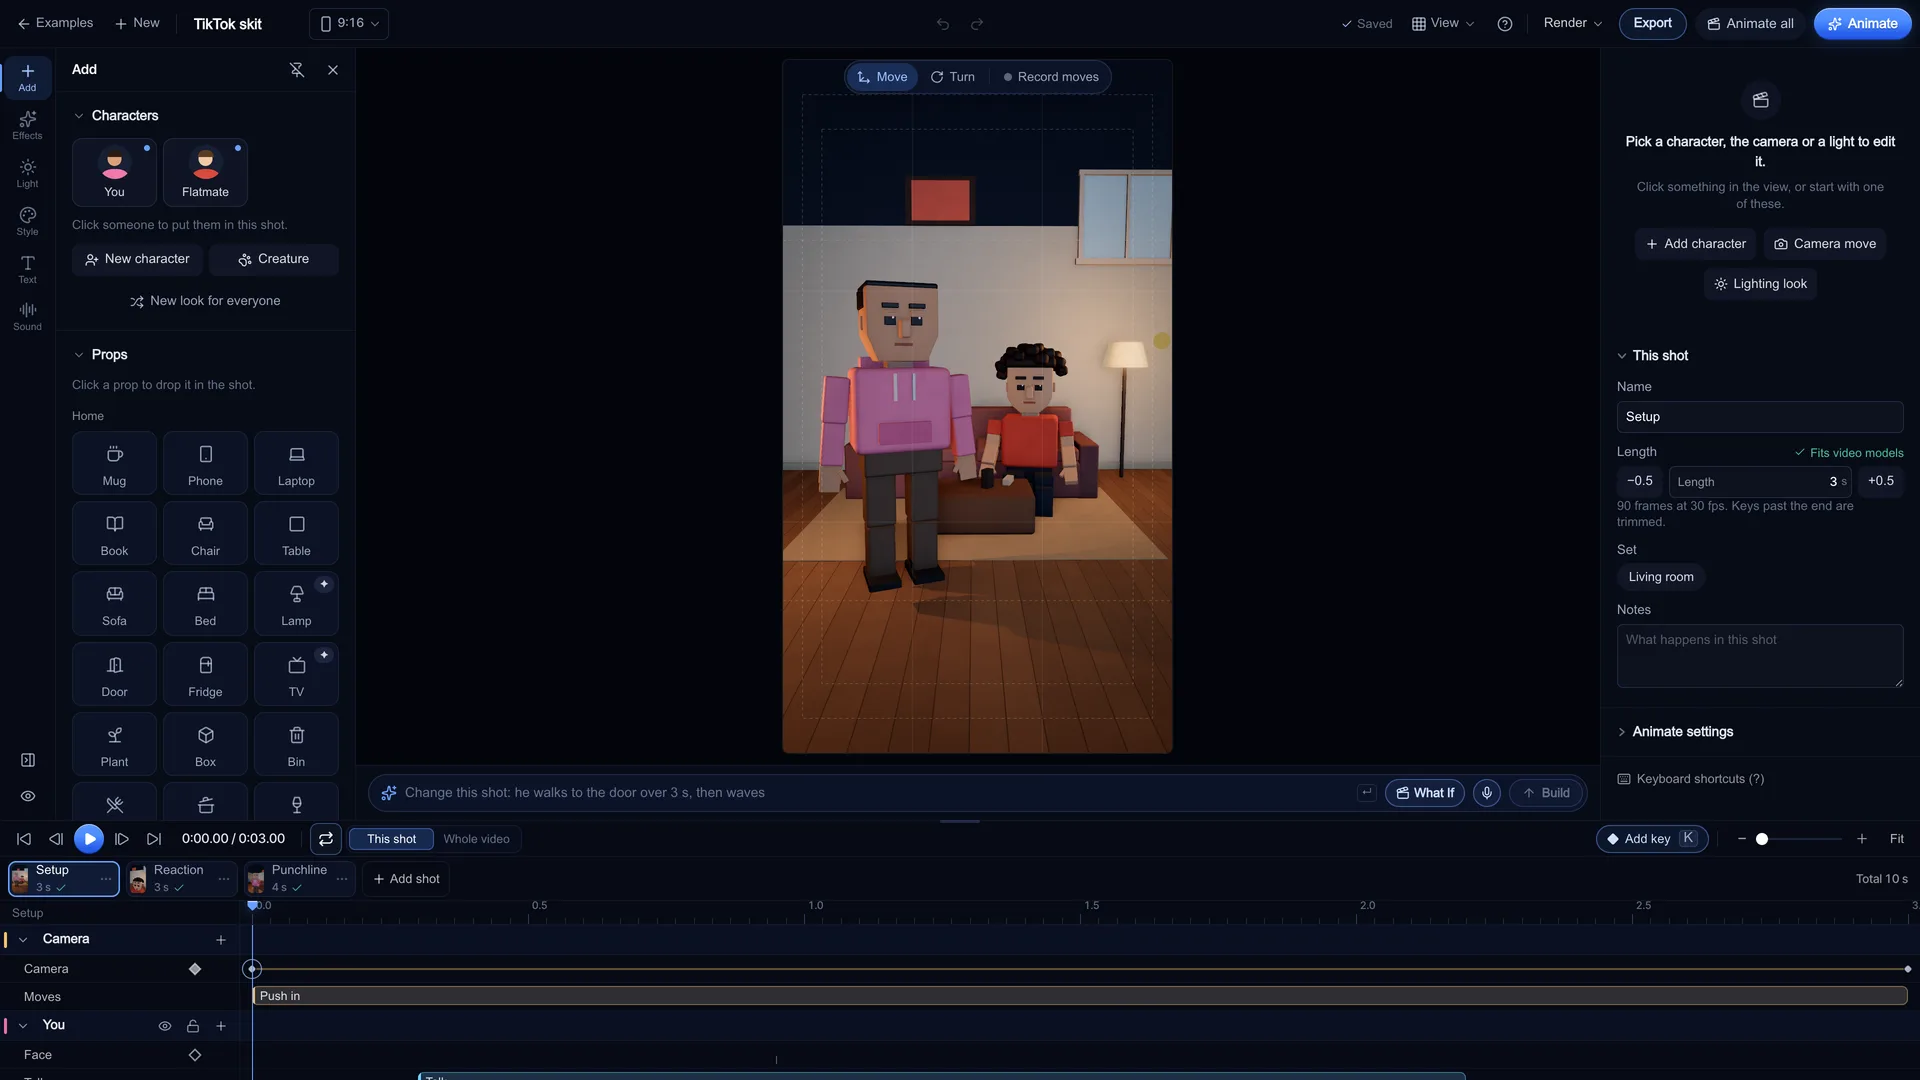
Click Camera in the scene list and open the Framing tab. Choose who to frame in Frame on, then a shot size: Extreme wide, Wide, Full, Medium, Medium close-up, Close-up, Extreme close-up, Two-shot, Over the shoulder, POV and Insert. Each tile writes a camera key at the playhead that frames that subject at that size. Set Angle (Eye level, Low or High) first; it applies the next time you pick a size.
Screenshot of kreatorflow.ai, 2026-11-06 - 2
Apply a move over a range
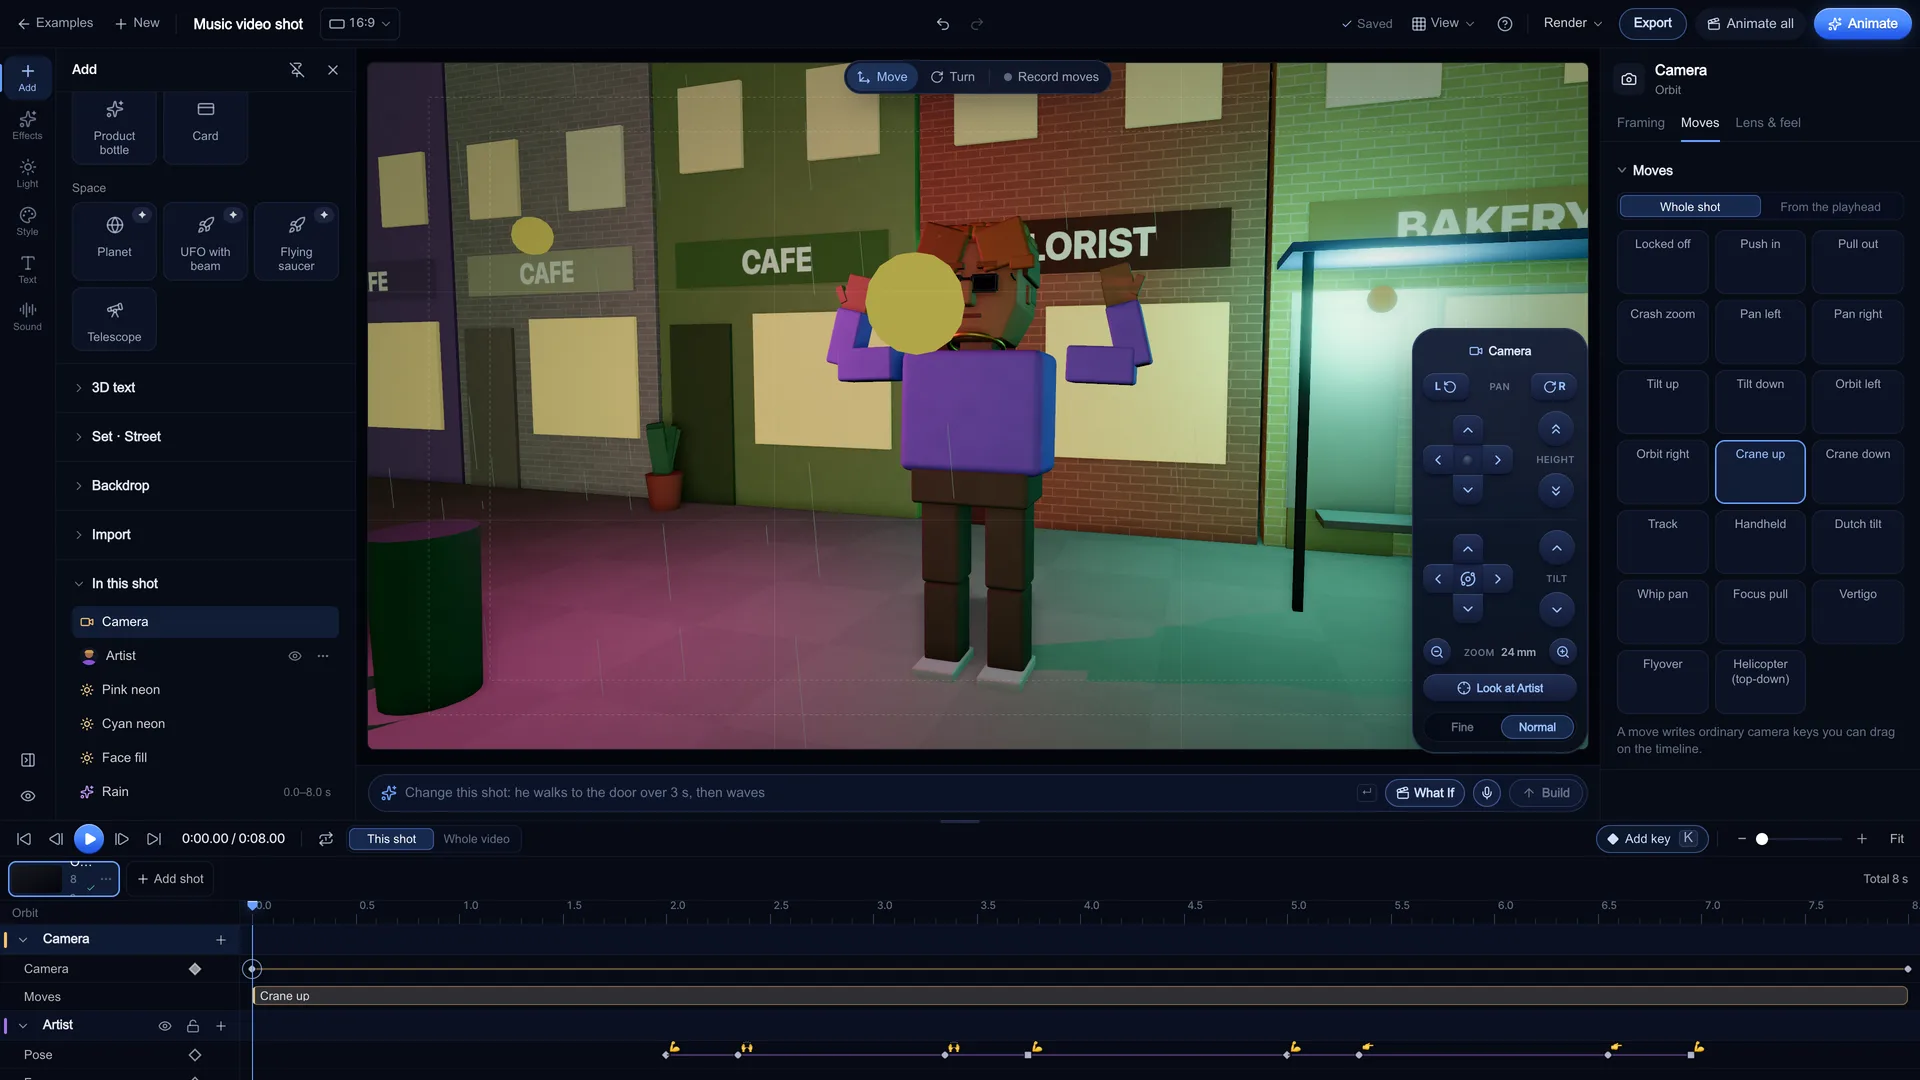
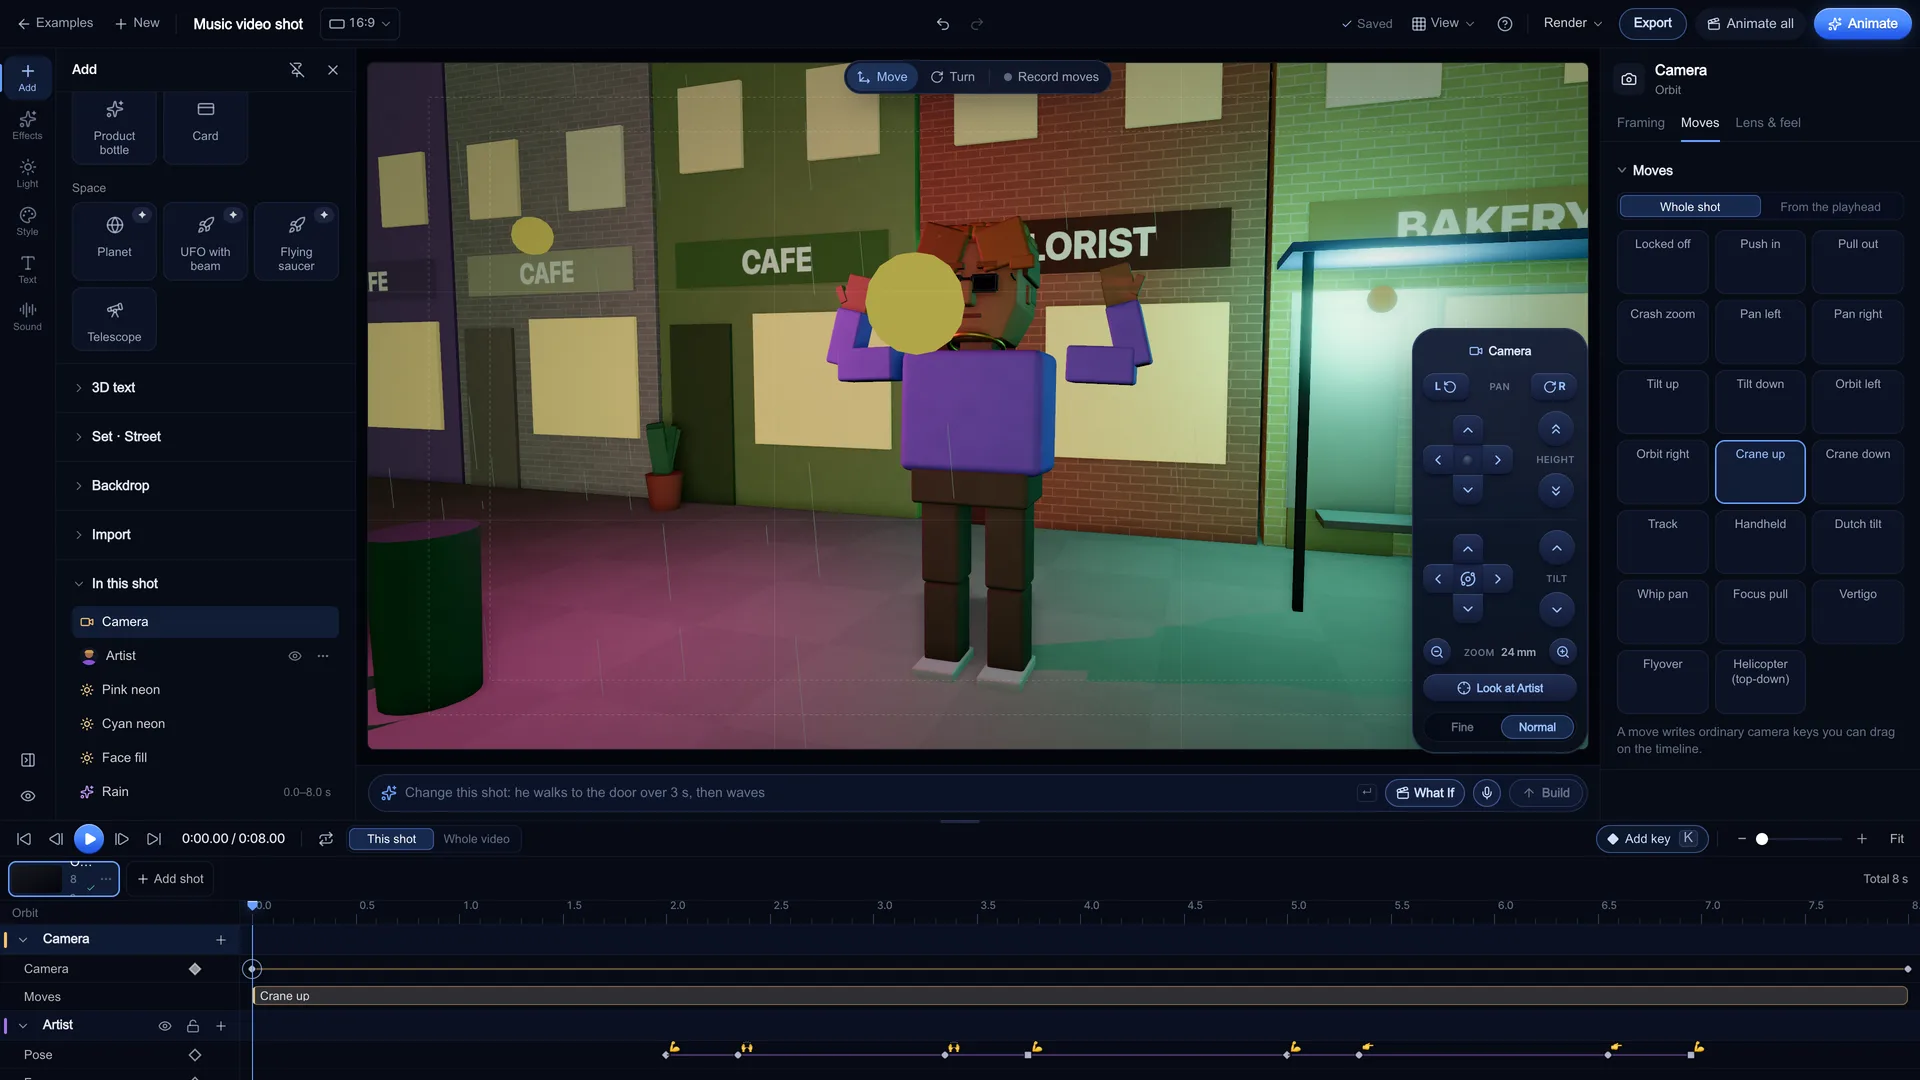
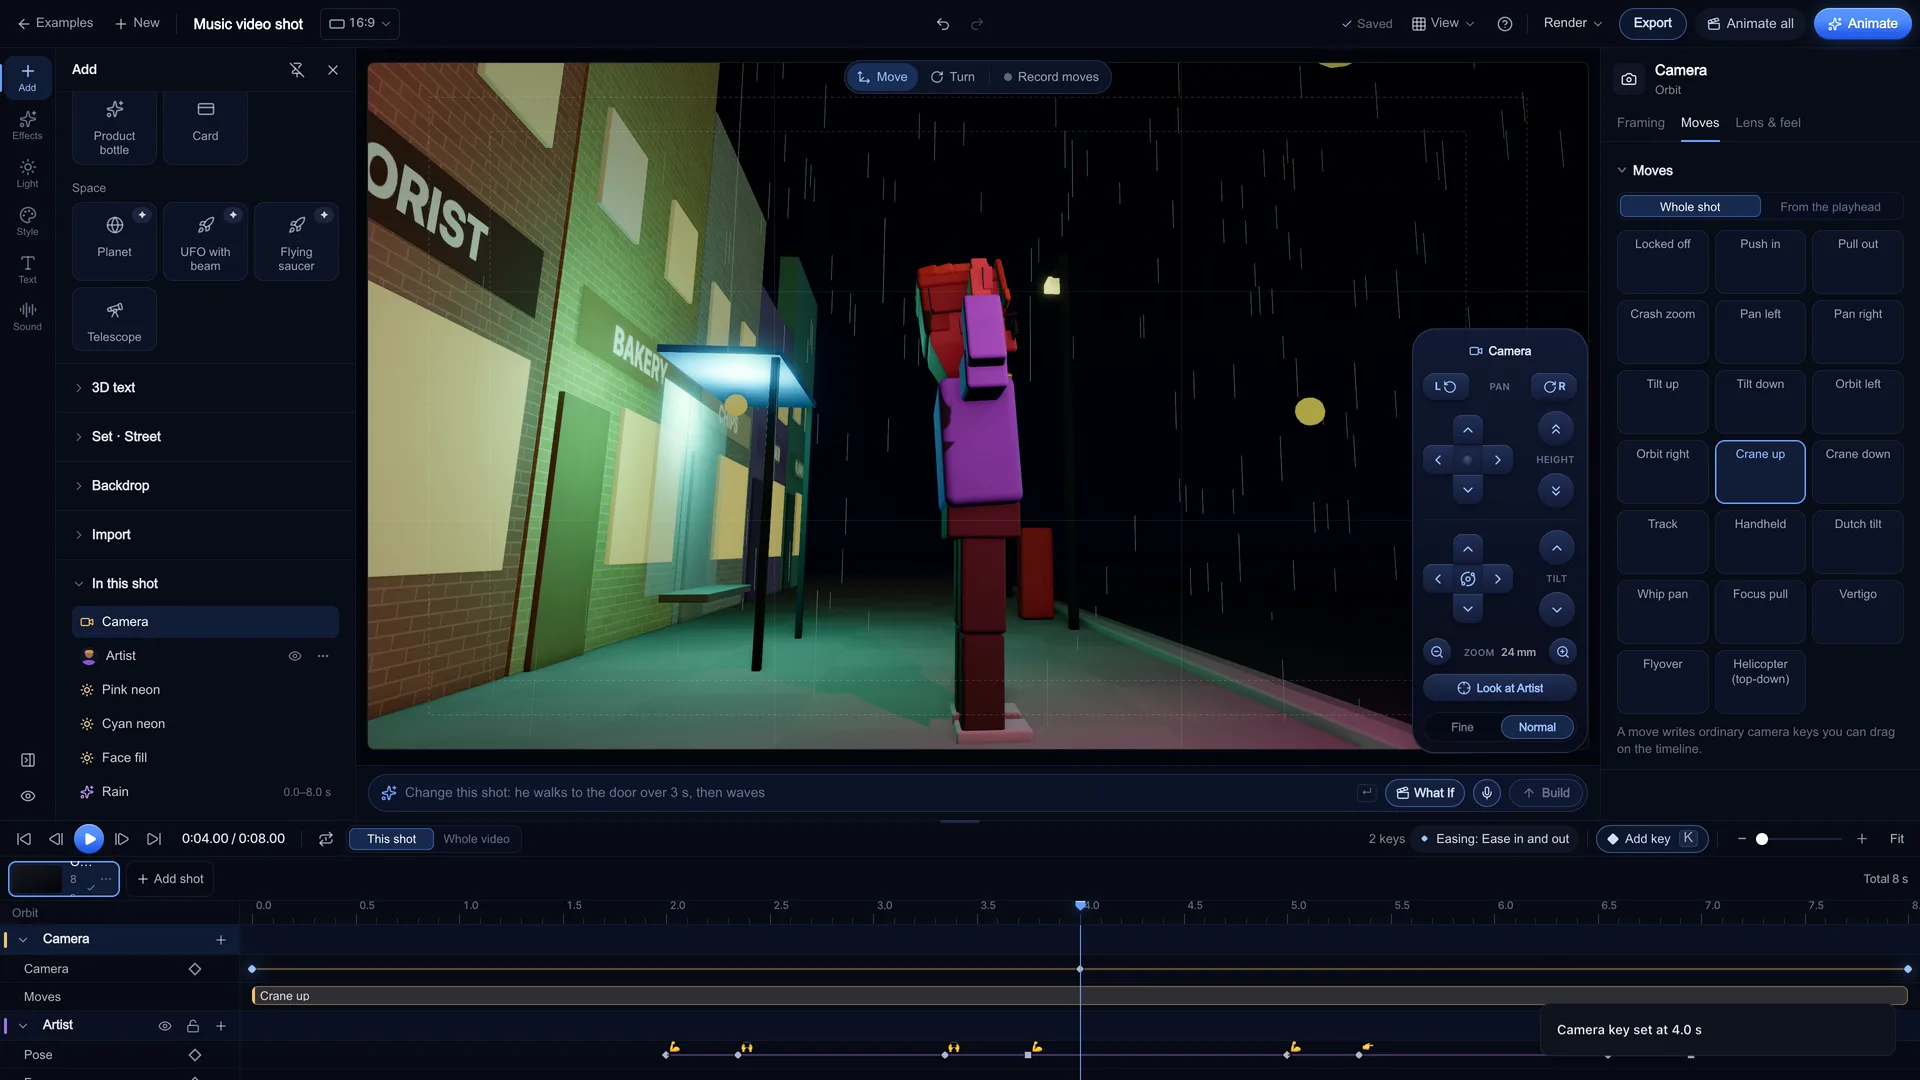
Open the Moves tab. Pick a Range (Whole shot, From playhead with a length in seconds, or Selected range), a Subject and a Strength, then click a tile in Push & pull, Orbit, Pan & tilt, Crane or Feel. Stage writes the keys, shows the move as a clip on the Moves row and plays the range once.
Screenshot of kreatorflow.ai, 2026-11-06 - 3
Set the lens
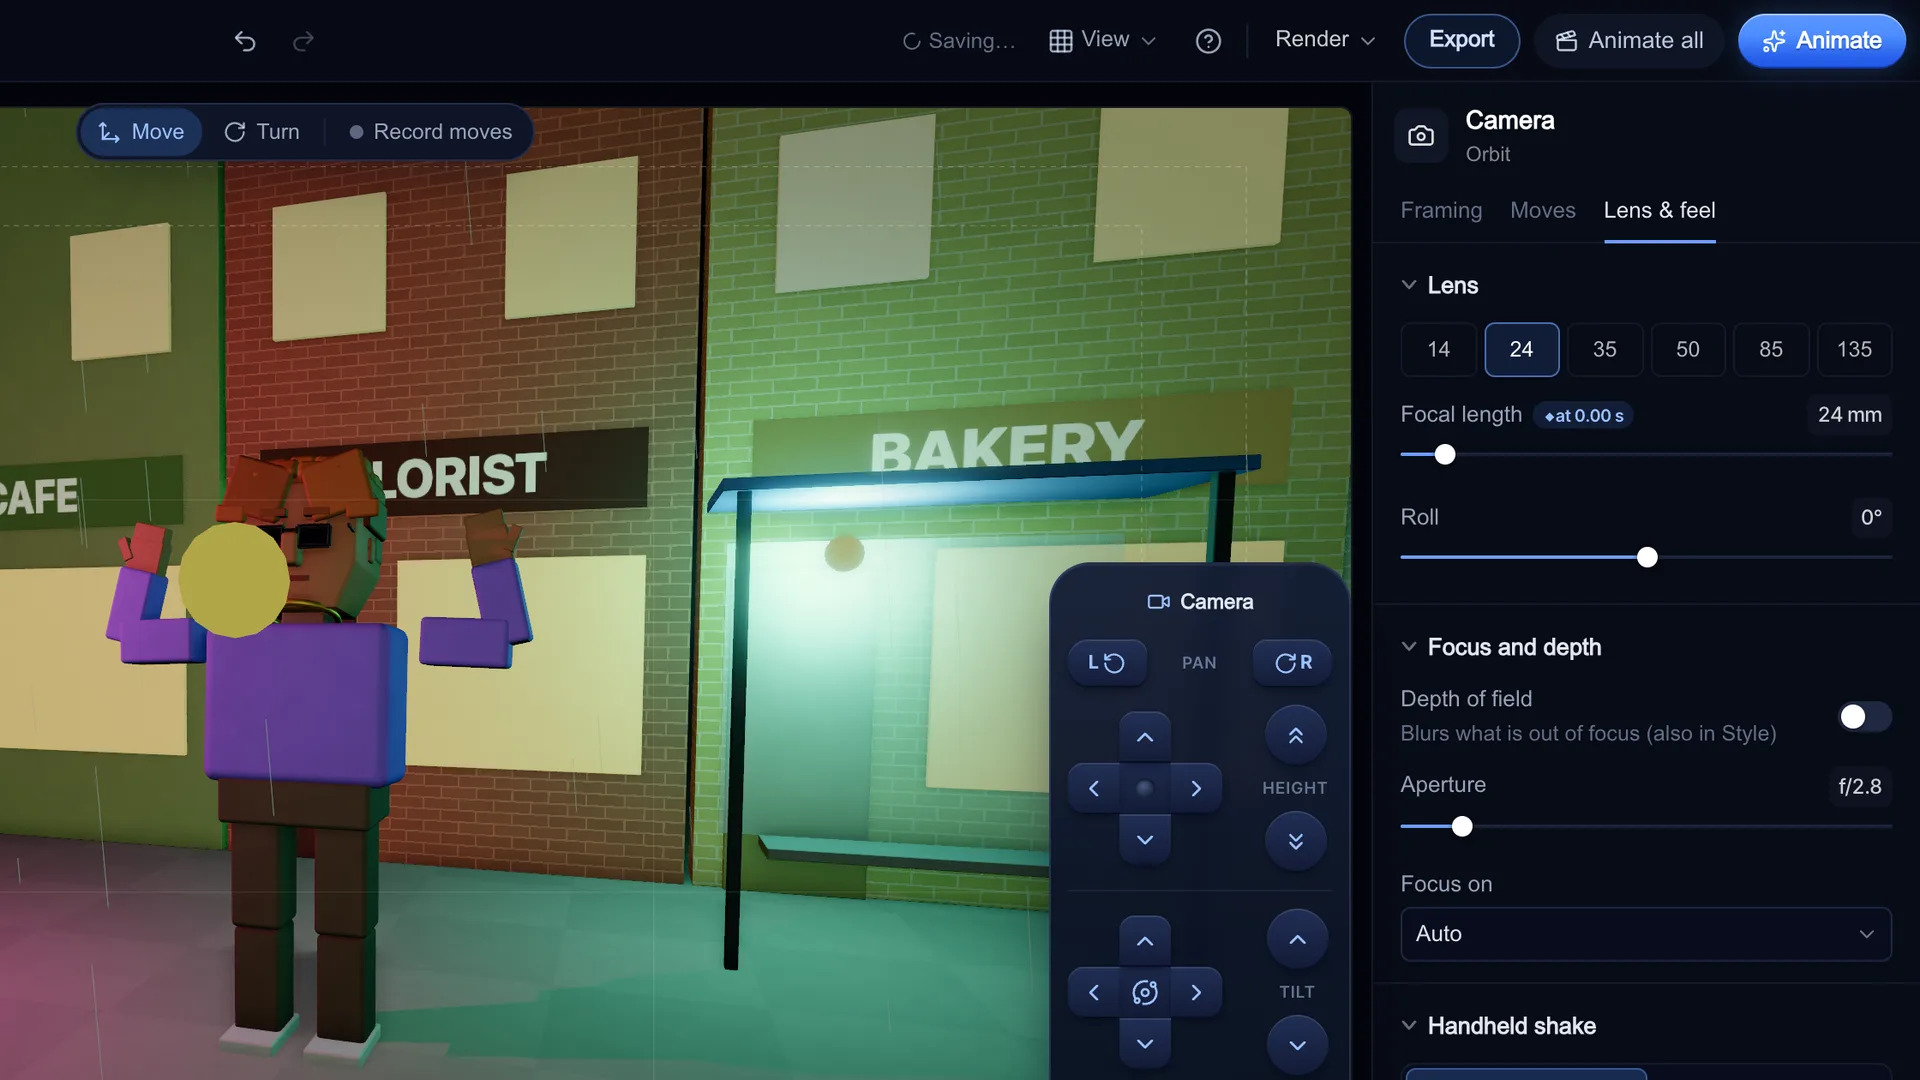
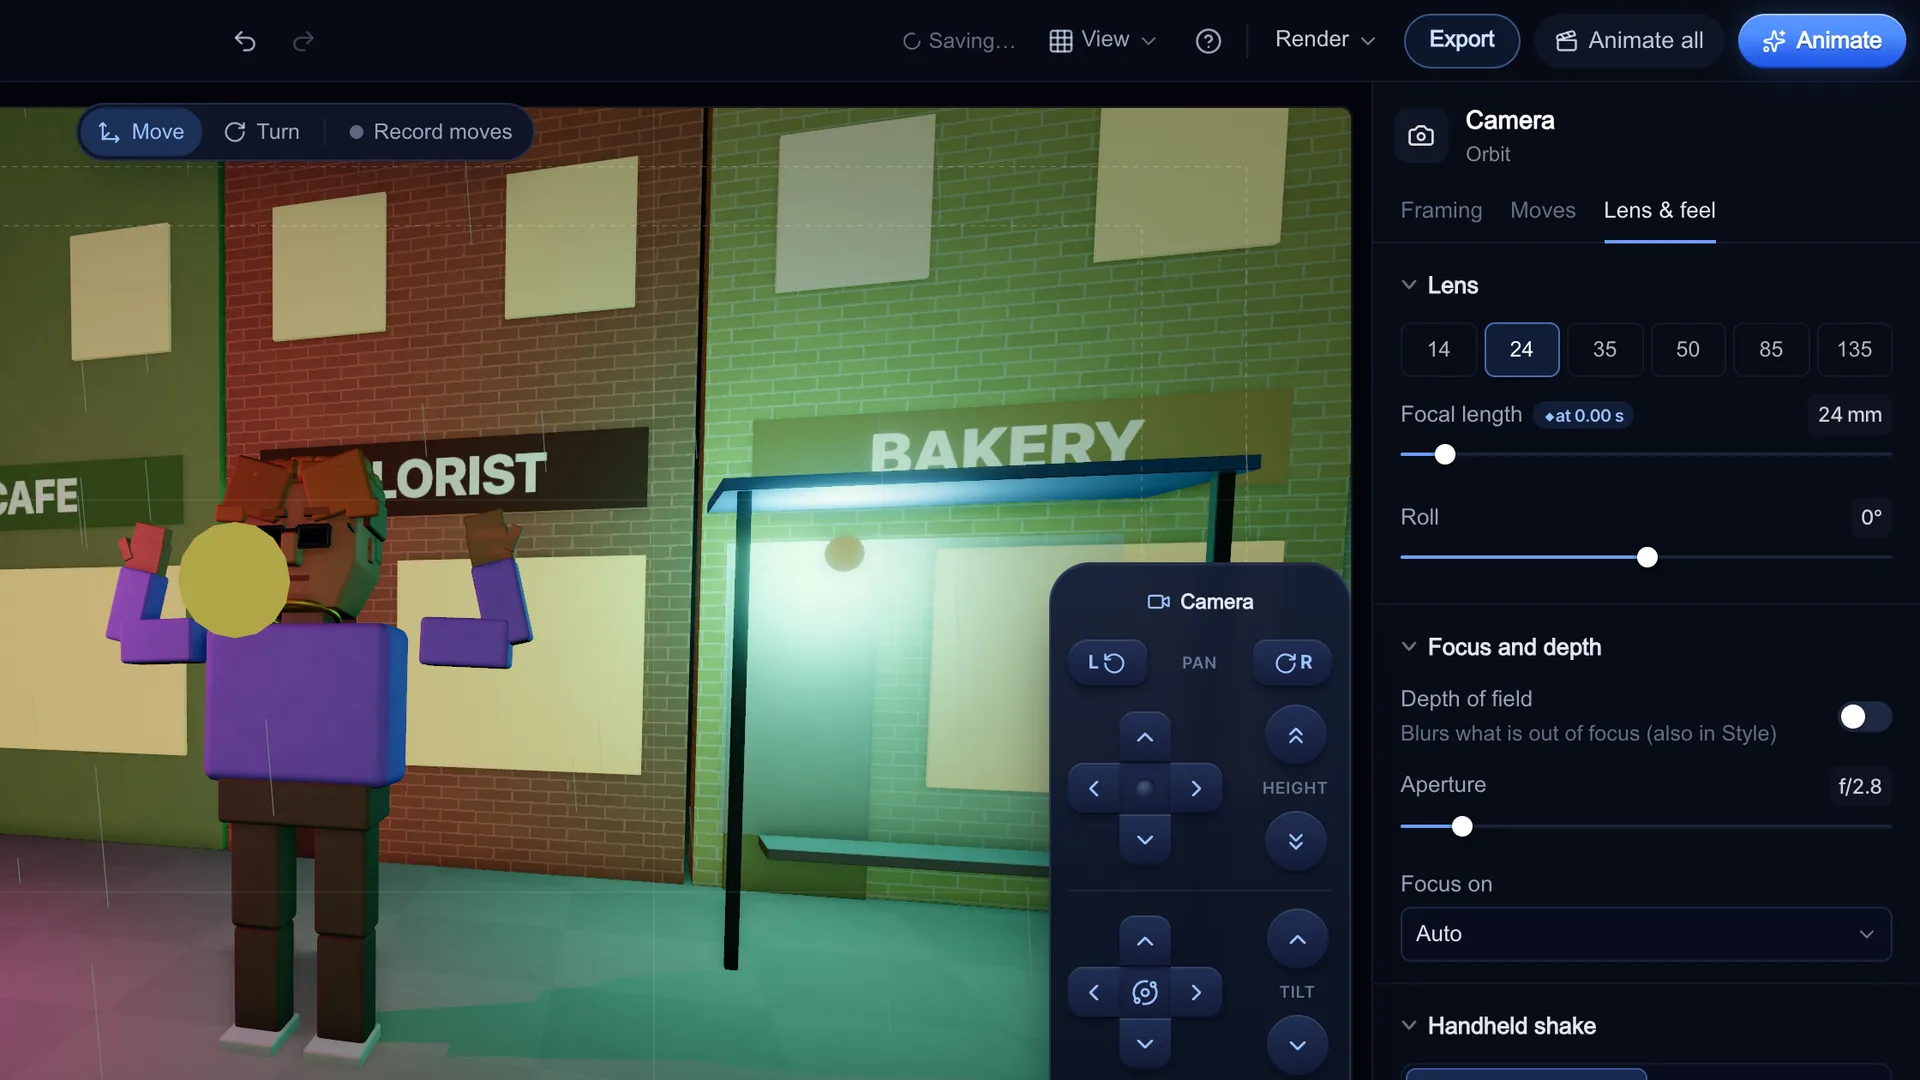
In Lens & feel, pick a lens chip (14, 24, 35, 50, 85, 135 mm) or drag Focal length anywhere from 10 to 200 mm. Wide lenses show more of the scene with stronger perspective; long lenses flatten it and soften the background. Lens, roll and focus each write a camera key at the playhead.
Screenshot of kreatorflow.ai, 2026-11-06 - 4
Ease the keys
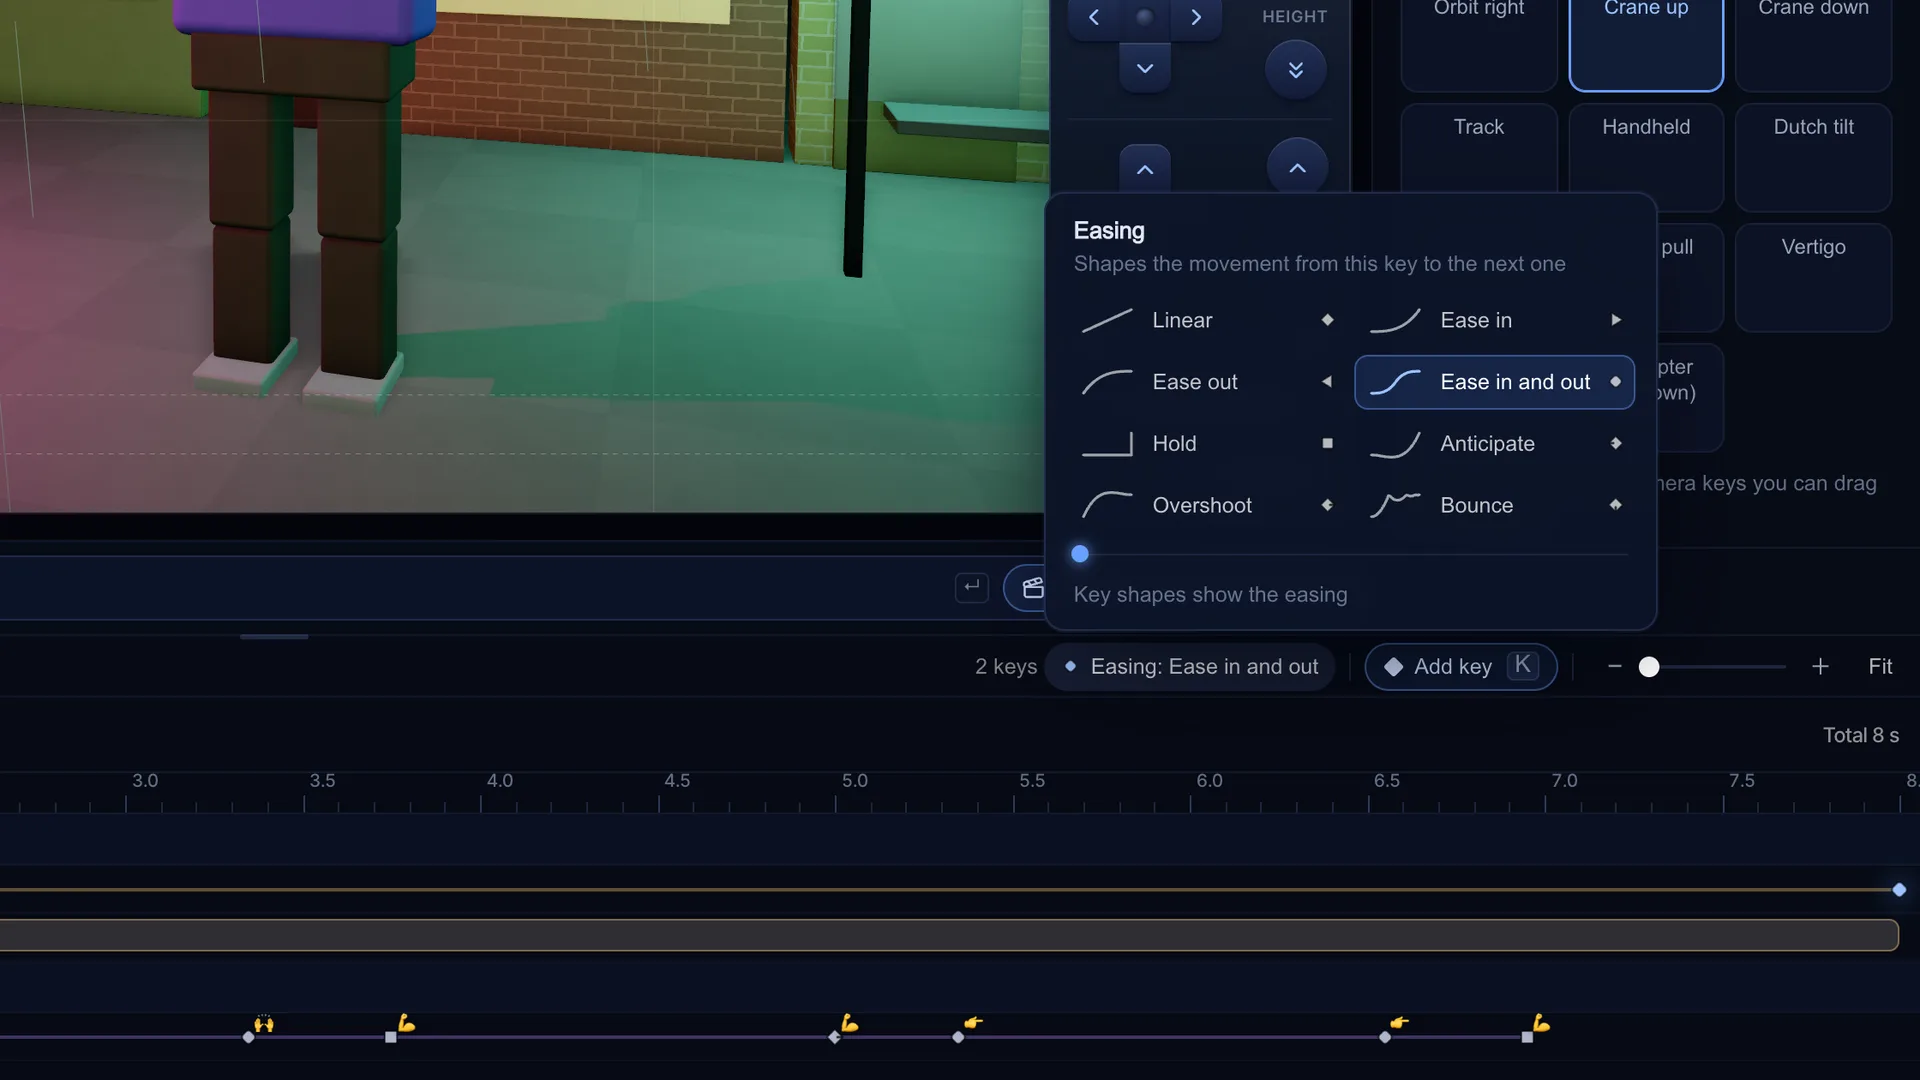
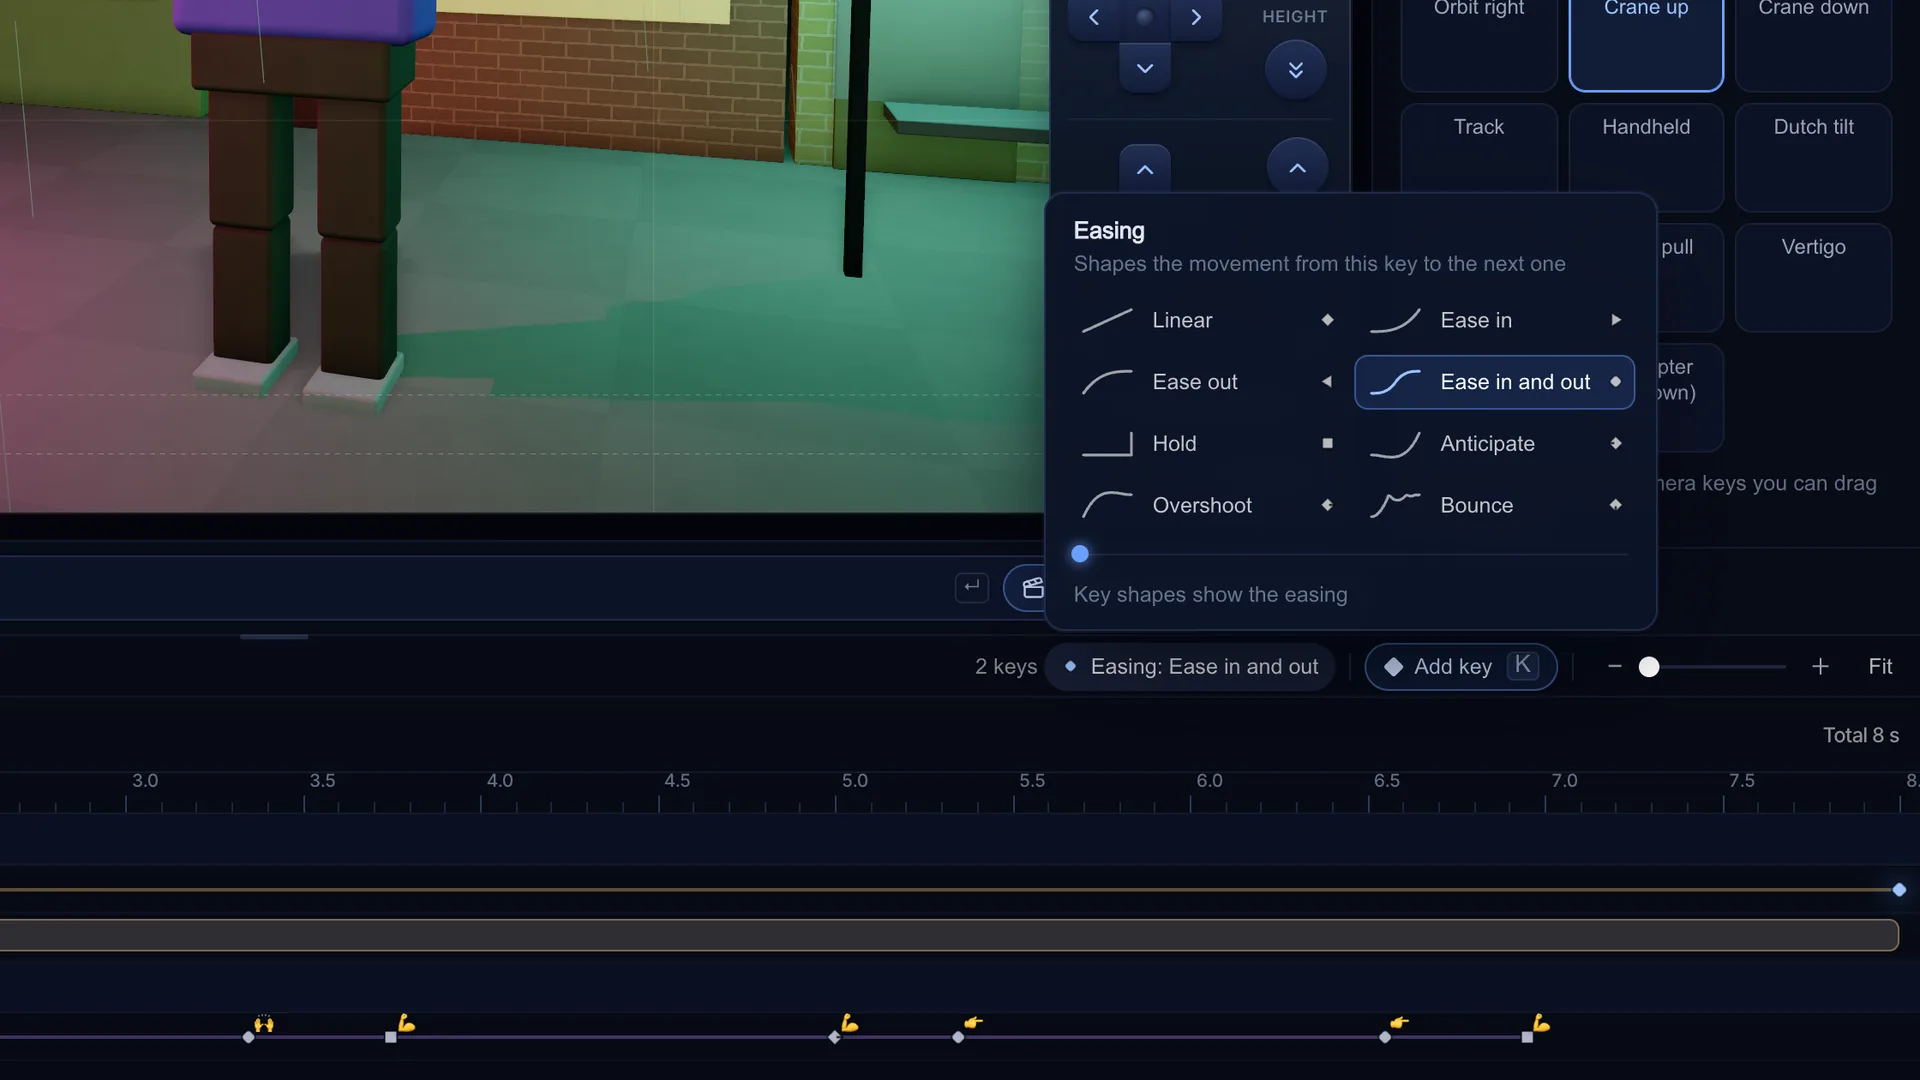
Select one or more camera keys on the timeline and use the Easing chip, which sets how each key moves into the next: Linear, Ease in, Ease out, Ease in and out, Hold, Anticipate, Overshoot and Bounce. Ease in and out is the default for most moves; Hold makes a hard cut in the camera, Overshoot and Bounce add a settle at the end.
Screenshot of kreatorflow.ai, 2026-11-06 - 5
Drag the view, then key it
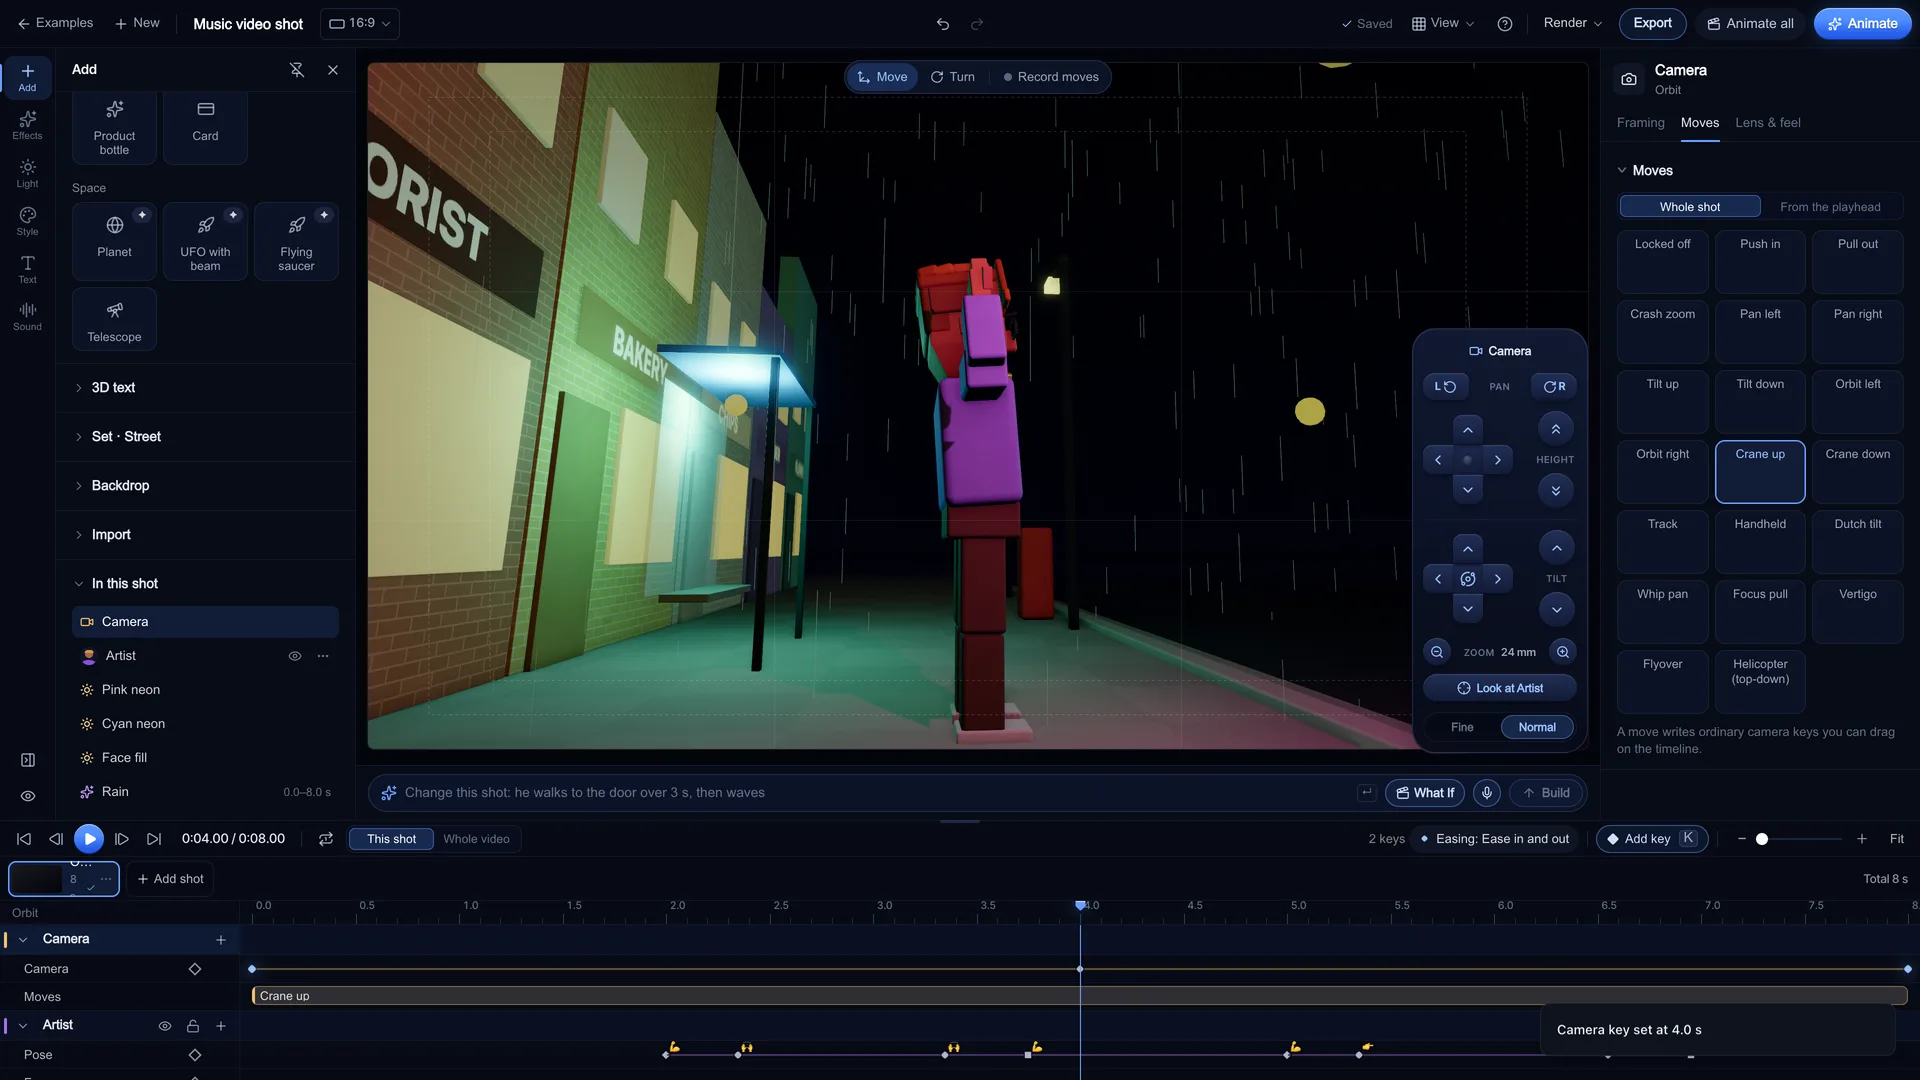
Move the playhead, drag in the viewport to orbit the camera, and let go: Stage sets a camera key at the playhead. Key camera here (or K while playback is stopped) keeps the current view as a key. The controller pad can push, slide, raise, orbit and zoom in small steps.
Screenshot of kreatorflow.ai, 2026-11-06 - 6
Play, loop and check the safe areas
Press Space to play, set Loop to Shot to watch the move again and again, and step with , and . one frame at a time. Turn on Guides and safe areas (G) to see the caption-safe and UI-safe zones, so a 9:16 move never parks a face under the captions.
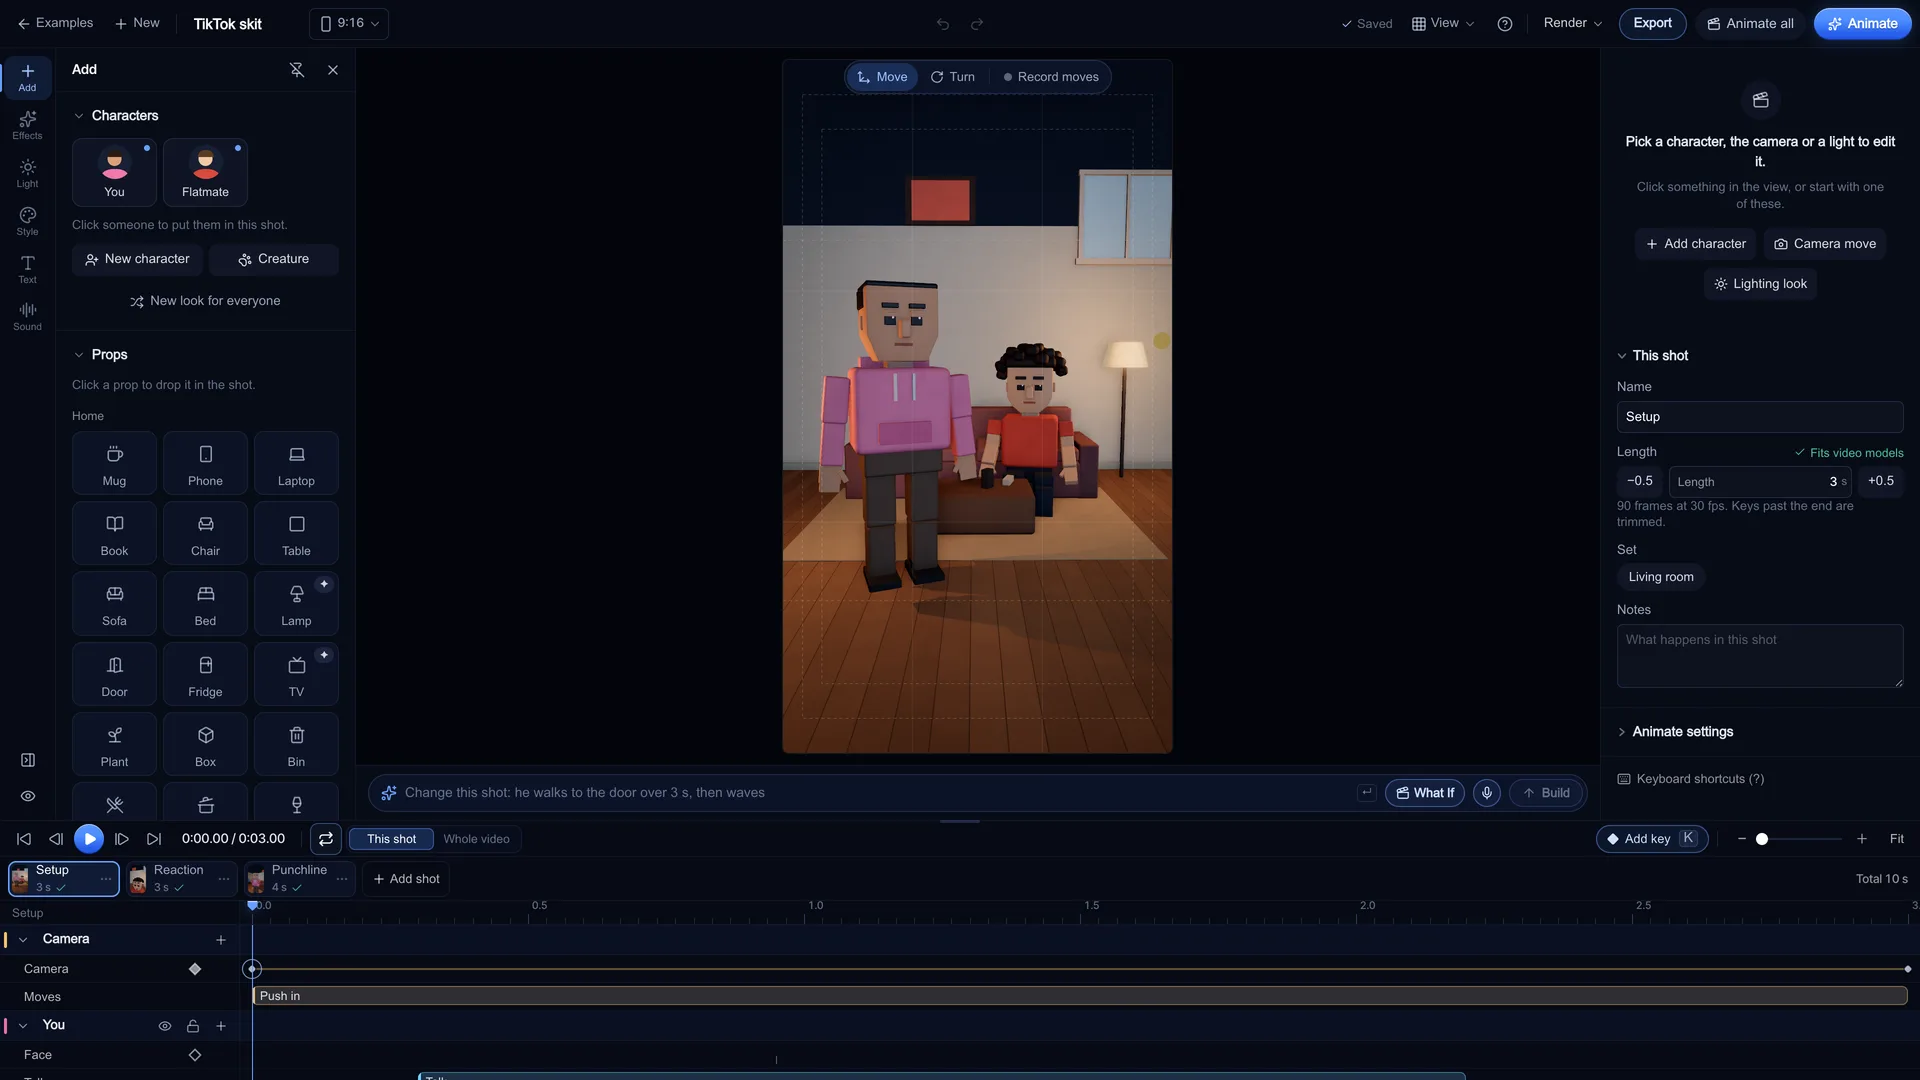
Screenshot of kreatorflow.ai, 2026-11-06
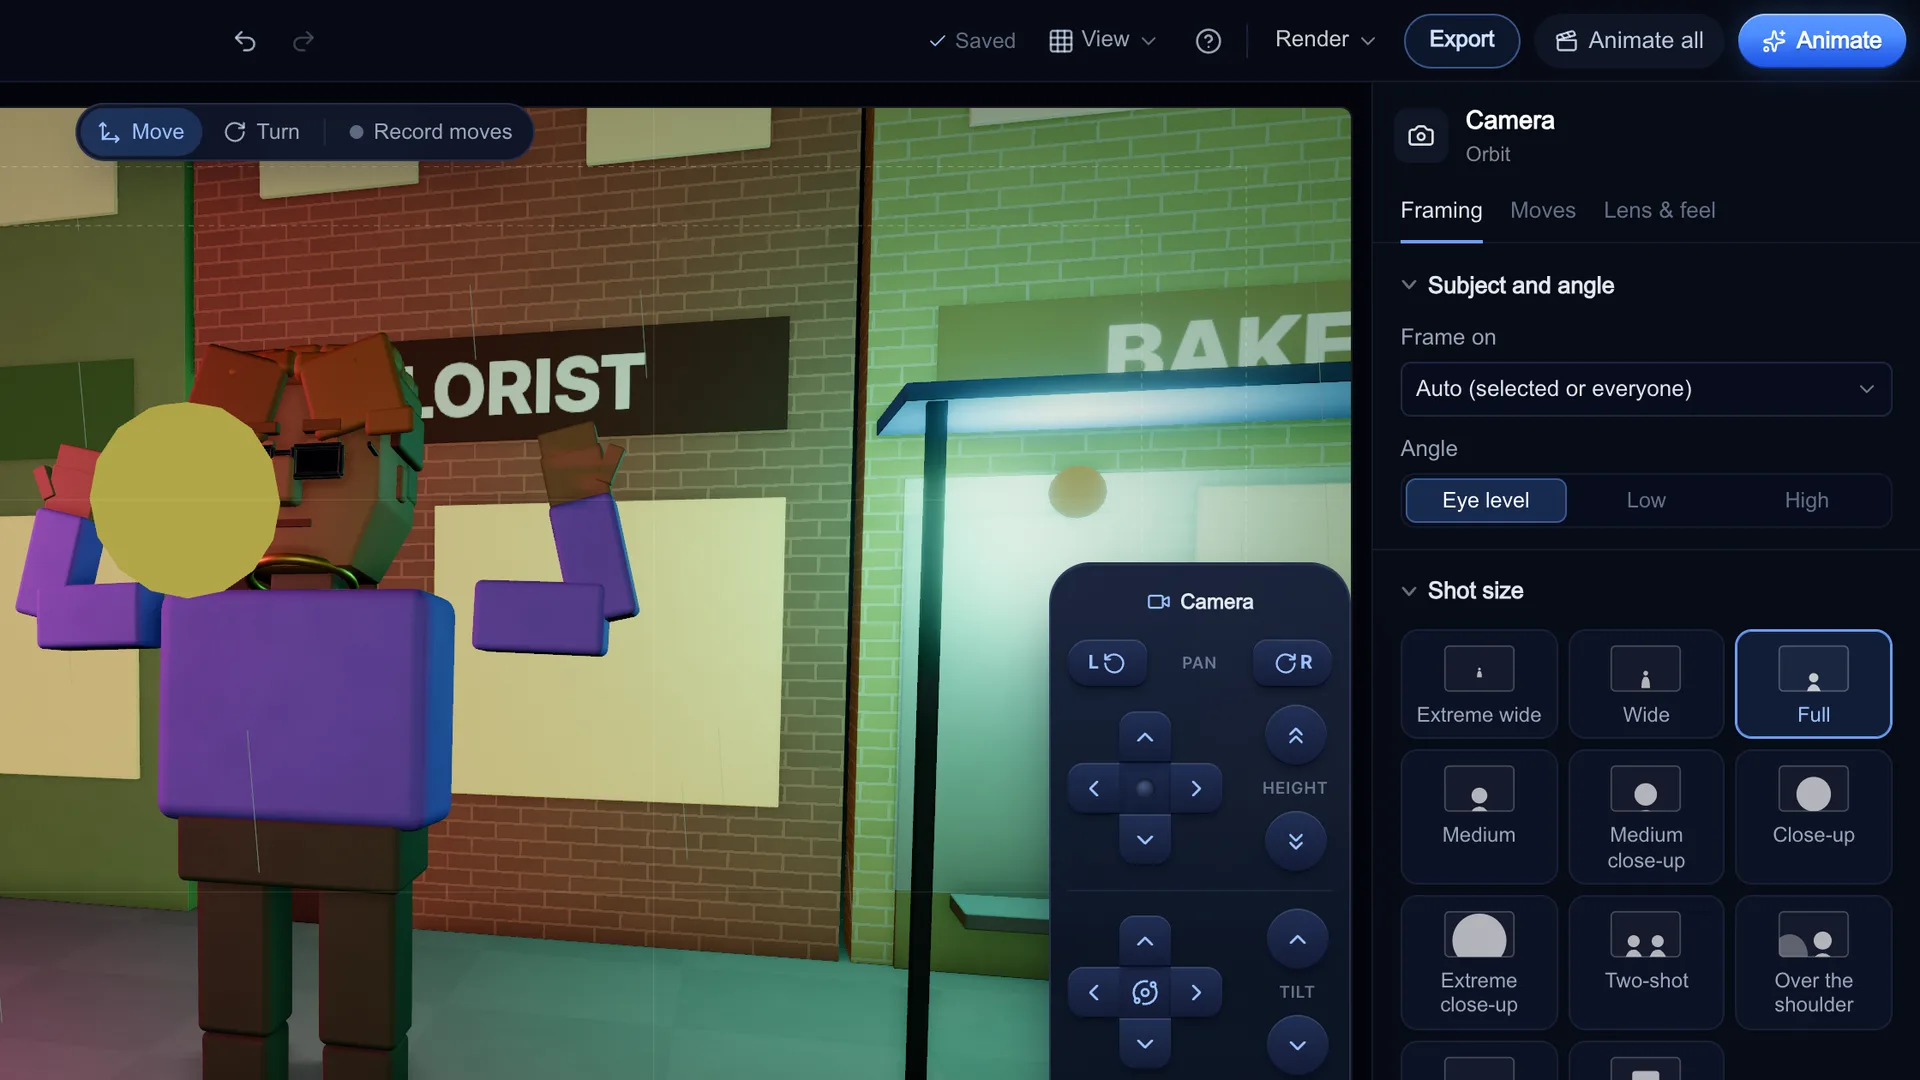
The 11 framings, plus low and high angle
Framing is where every move starts. Stage frames the subject for you at Extreme wide, Wide, Full, Medium, Medium close-up, Close-up, Extreme close-up, Two-shot, Over the shoulder, POV and Insert, picking a lens that suits the size, and Angle swaps eye level for a low or high camera.
Two framing guards help moves that change scale: Hold this size from here keeps at least a framing from a key on, even when the subject grows, and Keep in frame re-aims the camera (it never moves it) so a character's head never leaves the frame.
The 20 moves and what they write
Every move tile writes ordinary camera keys that you can drag, ease or delete on the timeline. A move stays one clip on the Moves row, so you can drag its ends to retime it, Re-apply it with a new strength, Convert to keyframes to keep the keys and drop the clip, or Delete move to remove it and the keys it wrote.
| Move | What it writes | Use it for |
|---|---|---|
| Locked off | Two hold keys with the same view | Dialogue, reactions, letting the action play |
| Push in | An end key closer to the subject along the line of sight; the lens stays the same | Building tension, landing on a face |
| Pull out | An end key further back along the line of sight | Revealing where we are, endings |
| Crash zoom | A much longer lens within a few frames, aimed at the subject's head, then a hold | Comedy beats, shocks, punchlines |
| Pan left | The camera stays put; the aim turns left | Following a move, revealing the side of a room |
| Pan right | The camera stays put; the aim turns right | Following a move, revealing the side of a room |
| Tilt up | The camera stays put; the aim pitches up | Revealing something tall |
| Tilt down | The camera stays put; the aim pitches down | Finding a detail on the floor or a table |
| Orbit left | An end key around the look-at point, played back on an arc | Hero shots, product turns |
| Orbit right | An end key around the look-at point, played back on an arc | Hero shots, product turns |
| Crane up | The camera rises (scaled to the shot) and the aim lifts a little | Openers, big endings |
| Crane down | The camera drops and the aim lowers a little | Arriving in a scene |
| Track subject | A key every half second that follows the subject across the ground, with linear easing | Walks, runs and chases |
| Handheld | A shake span (amount and speed) on the Shake row over the range | Documentary feel, panic, POV |
| Low angle | Reframes the shot size from below, on a wider lens (Framing ▸ Angle) | Making a character look powerful |
| High angle | Reframes the shot size from above (Framing ▸ Angle) | Making a character look small or alone |
| Dutch tilt | Rolls the camera towards the end key | Unease, something is wrong |
| Whip pan | Holds, then whips the aim sideways in the last few frames | Fast transitions between beats |
| Focus pull | Focus moves from a far distance onto the subject | Shifting attention to a character |
| Vertigo dolly zoom | Dollies in while the lens gets wider, so the subject keeps its size and the background stretches | The moment of realisation |
| Flyover | Rises over the middle of the scene and lands on the far side | Big reveals and establishing shots |
| Helicopter (top-down climb) | Goes straight overhead and climbs, turning slightly | World-scale shots and What If shorts |
Shot length vs the model's clip lengths
A Stage shot runs from 2 to 15 seconds in 0.5-second steps, but video models only make certain lengths. When you press Animate, Stage snaps the length to the nearest one the model offers (a tie goes to the longer one, so the planned action is never cut short), shows "Shot … s → video … s" and says the motion is timed for the new length.
Here is what a 7-second shot becomes on each model offered right now:
| Model | Lengths | A 7 s shot becomes | Frames pinned |
|---|---|---|---|
| Seedance 2.5 | 4, 5, 6, 8, 10, 12, 15, 20, 25, 30 s | 8 s (the dialog tells you) | Start only |
| Seedance 2.0 | 4, 5, 6, 8, 10, 12, 15 s | 8 s (the dialog tells you) | Start only |
| Seedance 2 Fast | 4, 5, 6, 8, 10, 12, 15 s | 8 s (the dialog tells you) | Start only |
| Seedance 2.0 Mini | 4, 5, 6, 8, 10, 12, 15 s | 8 s (the dialog tells you) | Start only |
Prompt-only camera vs a planned camera
A prompt such as "dolly zoom on her face" leaves the framing, the lens and the speed to the model, so every take is a little different. That is fine for one-off clips, and our dolly zoom and FPV prompt guides show how to word it.
A planned camera fixes the first frame exactly and gives the model a brief that names the move. Seedance gets the start frame as the real first frame. Use a plan when shots must cut together, match a storyboard or repeat across a series. A 5-second Seedance 2.0 clip costs 15 credits at 720p or 30 at 1080p, shown before you press Generate.
KreatorFlow is an official partner of BytePlus, a ByteDance company.
What is free and what costs credits
Planning in Stage is free and works signed out: framings, moves, lenses, easing, playback and previs video export all run in your browser on your own GPU, and projects are saved in this browser. The editor needs a desktop or laptop screen.
Animate on one shot uploads the start frame and opens the Video studio with the model, length, ratio and brief filled in. Nothing is spent in Stage; you see the cost and pay only when you press Generate there.
Questions other guides skip
Does Seedance follow my exact camera path?
Not frame by frame. The start frame is exact: Stage sends it as the real first frame. The motion after that is guided by the brief, which names your move, so the model follows the kind of move and its direction but not your exact keys. For tighter control keep moves simple and short, one move per shot.
Can the end of my move be pinned too?
Not with the models offered today: Seedance takes the start frame only, so the end of the move comes from the brief. Plan the final framing anyway, it is what the brief describes.
Can I export the camera to Blender, Unreal or Cinema 4D?
No. Stage does not export camera data to other 3D apps. It exports a previs video, clean start and end frames as PNG, and a project file that only opens in Stage. If your pipeline needs a camera in a desktop 3D app, keyframe it there; use Stage when the destination is an AI video model.
Why does a move look different after I change the shot length?
Keys sit at times in the shot. When you shorten a shot, keys past the new end drop away and the move is clipped. Re-apply the move on its clip after changing the length, or move the keys by hand.
Frequently asked questions
What are camera keyframes in AI video?
A camera keyframe stores where the camera is, where it aims, its lens, roll and focus at one moment. Two or more keys make a move. In Stage you plan those keys in 3D, then Animate turns the planned shot into an AI video.
How do I make a dolly zoom for AI video?
In Stage, frame the subject, open Moves and click Vertigo dolly zoom. It dollies in while the lens gets wider, so the subject keeps its size and the background stretches. Play it on a loop, adjust Strength, then Animate.
What lens should I use?
Use a wide lens (24 mm or less) for space and energy, 35 to 50 mm for natural framing, and 85 mm or longer for faces and soft backgrounds. Stage's lens chips are 14, 24, 35, 50, 85, 135 mm, and Focal length goes from 10 to 200 mm.
What are the keyboard shortcuts?
Space plays and pauses, K adds a key when playback is stopped, J and L step back or forward one second, comma and full stop step one frame, Home and End jump to the ends of the shot, Ctrl or Cmd + Z undoes, and G shows the guides and safe areas. Press ? for the full list.
Is Stage free?
Planning is free and works without an account. Turning a shot into a video uses credits in the Video studio, shown before you press Generate.